If you read woodworking magazines or frequent the newsgroups
or message boards you most certainly have read rave reviews about both the GRR-Ripper
and MJ Splitter from Micro Jig, Inc.
I read them as well but it took me a while to actually pull the trigger on a GRR-Ripper.
Having experienced a minor kickback shortly after firing up my Jet table saw when
I first got into this hobby, I have been very safety conscious about everything
I do around that saw. As cool and safe as the GRR-Ripper appeared, I just
couldn't see myself using the GRR-Ripper that much because I always use my Biesemeyer
splitter...and you can't use the GRR-Ripper as intended with that splitter.
If you've already read this review and are looking just
for the update, skip to the bottom of the document.
About a month ago I purchased a GRR-Ripper 2000 from Lee Valley. I thought
I was missing a couple of O-rings and emailed Micro Jig for replacements (The O-rings
weren't really missing; I found them hiding on my bench a couple of days later).
Shortly after requesting the O-rings I got a phone call from Henry Wang of Micro
Jig offering to send the missing parts. Micro Jig, Inc tries to personally
contact anyone who has a problem with their products. We had a great conversation
about the GRR-Ripper, splitter and even how to make ZC inserts. We concluded
the conversation with Micro Jig offering to provide another GRR-Ripper and a MJ
Splitter so that I could perform a thorough evaluation. At this point I still
wasn't sold on the GRR-Ripper as being anything more than a glorified push block
but pairing it with the MJ Splitter I was going to have the added safety I was looking
for.
This write-up does not have the normal level of detail and
testing I put into my reviews and it isn't supposed to. This is "quick
look report" as to how I felt about using the products. As I use them
more, I'll be updating this with that detail.
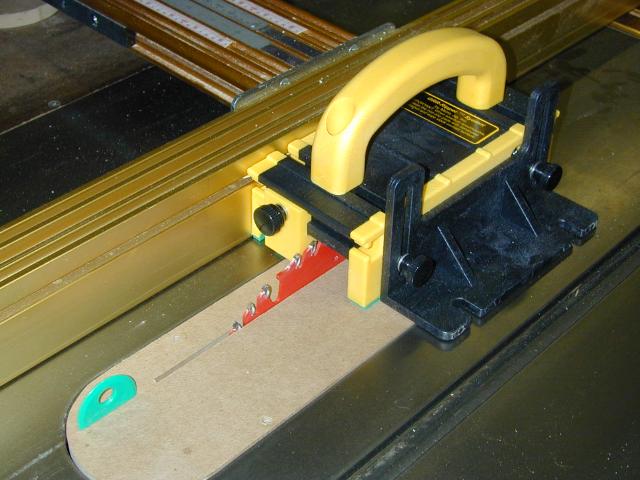
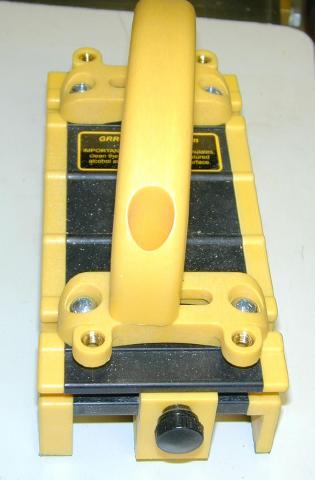
 The GRR-Ripper comes neatly packaged in a small
box and requires assembly. The only tool needed is a #2 phillips. I
mentioned O-rings earlier; Micro Jig cleverly uses these O-rings to captivate the
hardware on the configurable components of the GRR-Ripper. This way, when
you remove a leg, spacer or stabilizer because the current cut doesn't need it or
because you have to reconfigure the placement of a component, there is no loose
hardware. The hardware is captivated in the picture at left. Reading the instructions
and assembling the GRR-Ripper should take you about 20 minutes...or 30 minutes if
you don't read the instructions. :) You can also log on the Micro Jig web site and
watch animations
of the assembly process.
The GRR-Ripper comes neatly packaged in a small
box and requires assembly. The only tool needed is a #2 phillips. I
mentioned O-rings earlier; Micro Jig cleverly uses these O-rings to captivate the
hardware on the configurable components of the GRR-Ripper. This way, when
you remove a leg, spacer or stabilizer because the current cut doesn't need it or
because you have to reconfigure the placement of a component, there is no loose
hardware. The hardware is captivated in the picture at left. Reading the instructions
and assembling the GRR-Ripper should take you about 20 minutes...or 30 minutes if
you don't read the instructions. :) You can also log on the Micro Jig web site and
watch animations
of the assembly process.
The GRR-Ripper is constructed of High Impact Polystyrene and is hefty enough to
last forever.
 Ok,
so why is the GRR-Ripper more than just a glorified push block? The main innovative
design feature is the fact that the GRR-Ripper is in contact with and pushing both
the keeper and waste piece, assuring that they remain parallel to avoid kickback
while keeping your hands out of harms way. The gripping surfaces provide a
better grip than anything I've used thus far. Standard push blocks almost
universally use a not so durable, open-celled foam pad while the GRR-Ripper uses
a very sticky (that's sticky as in non slip) closed cell or rubbery (not sure just
what it is made of) pad.
Ok,
so why is the GRR-Ripper more than just a glorified push block? The main innovative
design feature is the fact that the GRR-Ripper is in contact with and pushing both
the keeper and waste piece, assuring that they remain parallel to avoid kickback
while keeping your hands out of harms way. The gripping surfaces provide a
better grip than anything I've used thus far. Standard push blocks almost
universally use a not so durable, open-celled foam pad while the GRR-Ripper uses
a very sticky (that's sticky as in non slip) closed cell or rubbery (not sure just
what it is made of) pad.
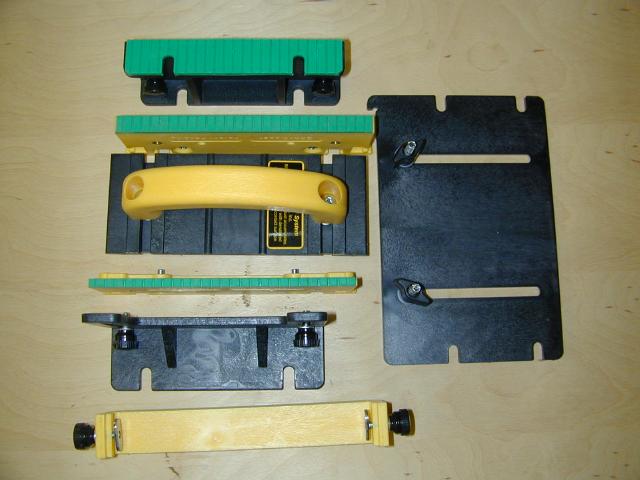
The GRR-Ripper can be configured to work with just about any
type of cut and it really excels with narrow, short rips and hard to hold shapes.
If you have two of them you can use the hand over hand method of feeding longer
stock but I haven't mastered that technique yet and I personally would not use that
method without a splitter. Micro Jig calls this technique "leap-frogging".
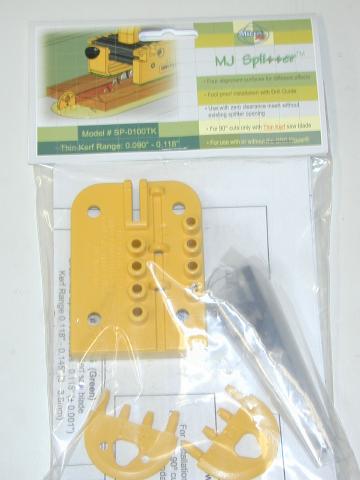 Ahh, the splitter. The MJ Splitter is a
pretty ingenious little device. It will take a bit longer to set up the first
one than a GRR-Ripper but it is pretty simple and you only have to make the installation
Jig once. The included instructions are simple to follow and again you can
log on to the web site and view their online pictures. The MJ Splitter comes
in three flavors, full kerf, thin kerf and their new double thin kerf splitter.
I have all three versions and will be taking a look at them as time permits.
Right now, I'm testing the full kerf version.
Ahh, the splitter. The MJ Splitter is a
pretty ingenious little device. It will take a bit longer to set up the first
one than a GRR-Ripper but it is pretty simple and you only have to make the installation
Jig once. The included instructions are simple to follow and again you can
log on to the web site and view their online pictures. The MJ Splitter comes
in three flavors, full kerf, thin kerf and their new double thin kerf splitter.
I have all three versions and will be taking a look at them as time permits.
Right now, I'm testing the full kerf version.
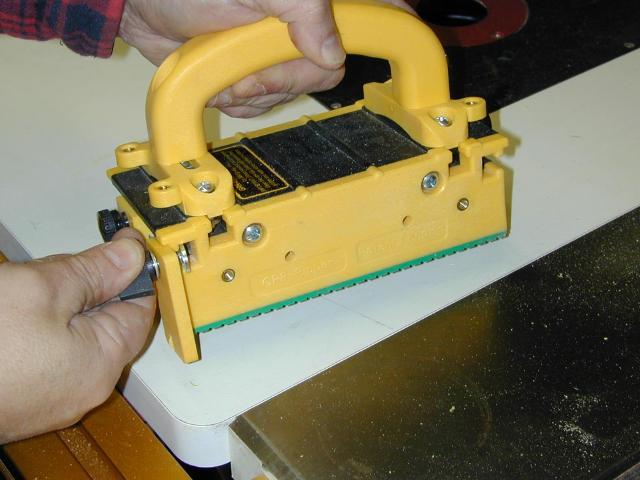
The MJ Splitter requires the use of a zero clearance insert
(ZCI). Half inch MDF or birch plywood work great for this. Because the
feather board action of the MJ Splitter works on as little as .003", your ZCI
must be tight in the opening. One way to accomplish this is to run down to
your local hardware store and pick up some nylon set screws and the appropriate
tap. Then tap 2 holes into one side of the insert and one into the side on
the front. With these 3 set screws you can adjust the insert to be tight in
the saw. You'll also want to tap 4 holes through the top of the insert in
the same place as the OEM insert so that you use these set screws for leveling (see
below).

The 3/4" hole in the ZCI is to stick your finger in to remove the ZCI. The
cutout next to it was already there as I used these ZCI's with my Biesemeyer as
well.
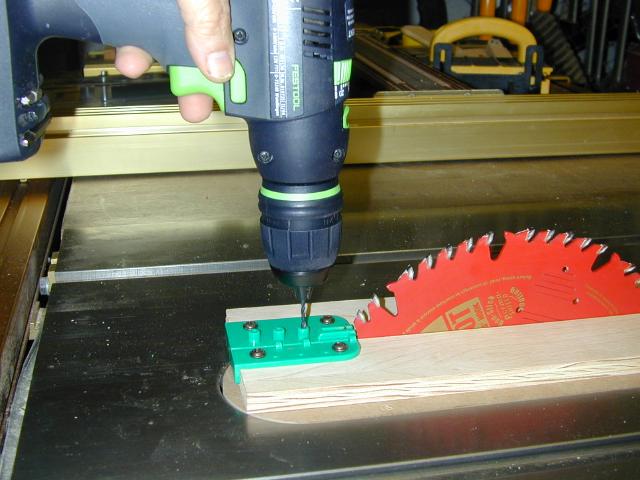 With the ZCI on the saw, you follow the instructions
and make the jig. The required drill bit and screws are included. You'll
need a piece of 1/2" material that is about 15" long and 4" wide.
Once the jig is made and positioned properly over the ZCI, you drill the mounting
holes for the splitter. Next you insert one of the two splitter inserts included
in the package. Which splitter insert you use and which side faces away from
the fence is determined by how much pressure you want (in increments of .003) on
the keeper piece. This can in essence act as a feather board pushing
the keeper up against the fence, behind the blade.
With the ZCI on the saw, you follow the instructions
and make the jig. The required drill bit and screws are included. You'll
need a piece of 1/2" material that is about 15" long and 4" wide.
Once the jig is made and positioned properly over the ZCI, you drill the mounting
holes for the splitter. Next you insert one of the two splitter inserts included
in the package. Which splitter insert you use and which side faces away from
the fence is determined by how much pressure you want (in increments of .003) on
the keeper piece. This can in essence act as a feather board pushing
the keeper up against the fence, behind the blade.
 Using the GRR-Ripper with the MJ Splitter is in
my opinion the best way to use the GRR-Ripper. You get all the safety features
that the GRR-Ripper alone offers, plus you get the added security of a splitter
to help prevent the back end of the blade from picking up the work and throwing
it back at you. Even using the GRR-Ripper if you have a mental lapse and don't
keep the GRR-Ripper up against the fence, you could be in trouble. The MJ
Splitter will help protect you in those situations. I think that Micro Jig
should offer a GRR-Ripper 1500 and 2500 package which includes the MJ Splitter since
I think they work best when used to compliment each other.
Using the GRR-Ripper with the MJ Splitter is in
my opinion the best way to use the GRR-Ripper. You get all the safety features
that the GRR-Ripper alone offers, plus you get the added security of a splitter
to help prevent the back end of the blade from picking up the work and throwing
it back at you. Even using the GRR-Ripper if you have a mental lapse and don't
keep the GRR-Ripper up against the fence, you could be in trouble. The MJ
Splitter will help protect you in those situations. I think that Micro Jig
should offer a GRR-Ripper 1500 and 2500 package which includes the MJ Splitter since
I think they work best when used to compliment each other.
Even with all the safety features the attribute of the GRR-Ripper
that I think contributes most to my safety is the fact that using
the GRR-Ripper requires me to THINK about every cut. No more do I just
set my fence and grab a push stick and make the cut. I have to set up the
GRR-Ripper. I have to know where the blade will pass. I have to know
where the center pad is and where the outer pad will grab the waste piece.
None of this is complicated but it forces me to THINK, and thinking is the
most important component of safety.
Again, more to come on these products as I get more time on
them. I see the GRR-Ripper living at my table saw, router table and
jointer.
UPDATE
Since the original writing I've used the GRR-Ripper and MJ Splitter while making
a table and an aquarium hood. I've used the GRR-Ripper on my table saw, router table
and jointer. I've become quite comfortable using the GRR-Ripper for small work on
my table saw and have even used the "leapfrog" method. On the router
I set up and cut both simple and odd shapes and believe that because of the control
I had over the pieces being cut, the quality of the work was better than had I used
something else...unless I was to have constructed something exactly like the GRR-Ripper.
On the jointer they were used simply as push blocks and I can't honestly say that
they worked any better than the other plastic push blocks I have.
On the table saw I used the GRR-Rippers for ripping 4/4 lumber, squaring 2"
laminated legs and ripping three foot long 1/4" inch strips of walnut for some
bead detail. The GRR-Ripper made it all both easier and safer.
I did run across a problem. On two separate occasions I failed to tighten the knobs
on the adjustable middle leg, and the studded knob worked loose and fell off in
the path of the blade. On neither occasion did they fall off onto the blade so I
was lucky. These studs aren't very long and it wont take much to cause a loose stud
to back out.
Microjig is working on a simple remedy for this, and I've got a couple of DIY fixes
you can try that work.
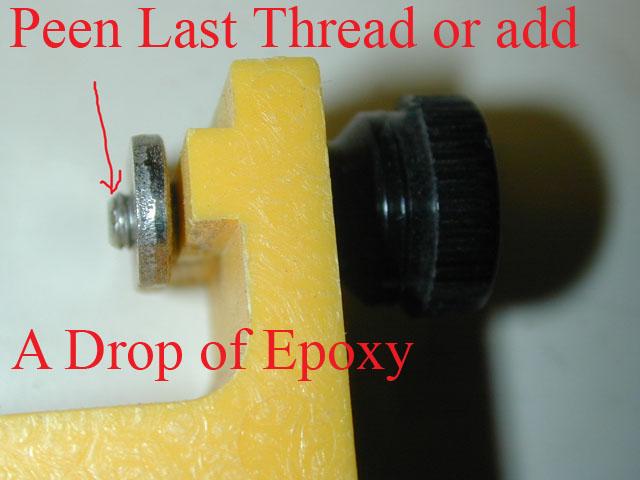
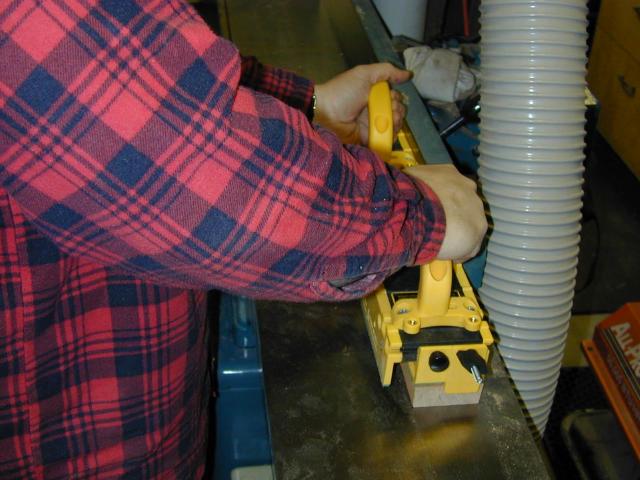
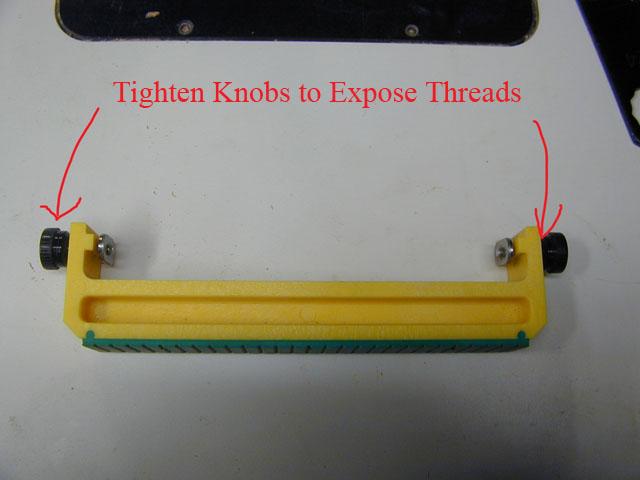 The
first thing you will need to do is remove the center leg. You do that by removing
one of the outer legs and loosening up the center legs knobs and slide it off. Next
tighten up both knobs so that you expose the last couple of threads of the studs.
(photo left). I then took the assembly over to my vise along with a hammer and a
punch and I dinged up the last thread on each stud. This prevents the oval nut from
coming off (photo right). An alternative to the peening is to simply put a drop
of five minute epoxy on the last thread. All we need to do is to create some resistance
so the nuts wont back off.
The
first thing you will need to do is remove the center leg. You do that by removing
one of the outer legs and loosening up the center legs knobs and slide it off. Next
tighten up both knobs so that you expose the last couple of threads of the studs.
(photo left). I then took the assembly over to my vise along with a hammer and a
punch and I dinged up the last thread on each stud. This prevents the oval nut from
coming off (photo right). An alternative to the peening is to simply put a drop
of five minute epoxy on the last thread. All we need to do is to create some resistance
so the nuts wont back off.
UPDATE 15 JAN 2005
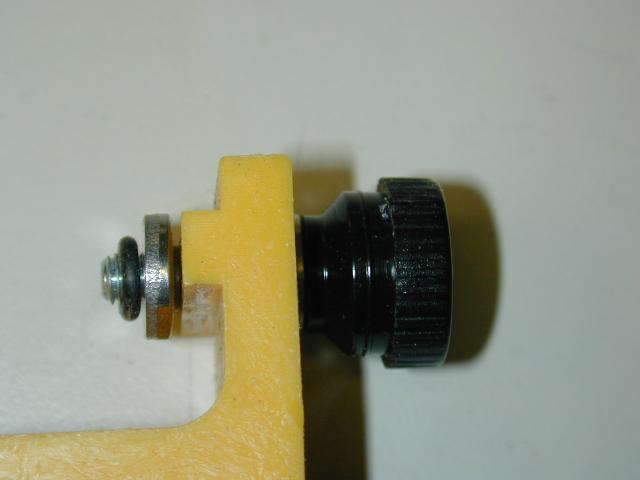 Ok
folks, here's a short term fix. When reassembling the stud, I tried it with and
without the steel washer. The pic at right is with the washer, I prefer without
as it gives you at least another turn before running into the o-ring. Microjig will
be kiting a longer stud and a retaining o-ring like they use on their other fasteners
for those who want the fix.
Ok
folks, here's a short term fix. When reassembling the stud, I tried it with and
without the steel washer. The pic at right is with the washer, I prefer without
as it gives you at least another turn before running into the o-ring. Microjig will
be kiting a longer stud and a retaining o-ring like they use on their other fasteners
for those who want the fix.
Microjig will continue to investigate this issue and this may not end up as the
final solution.
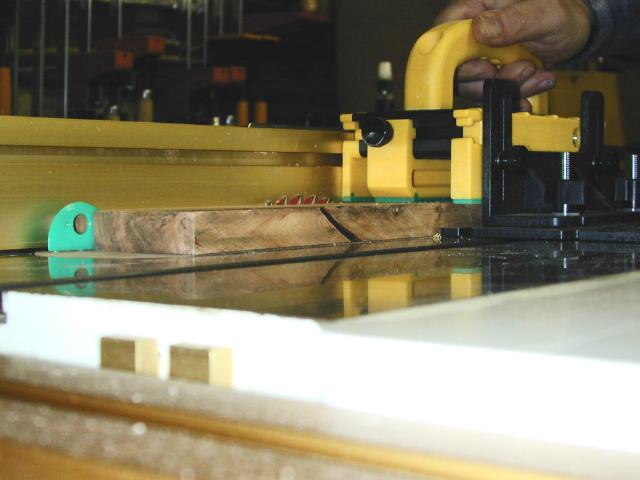
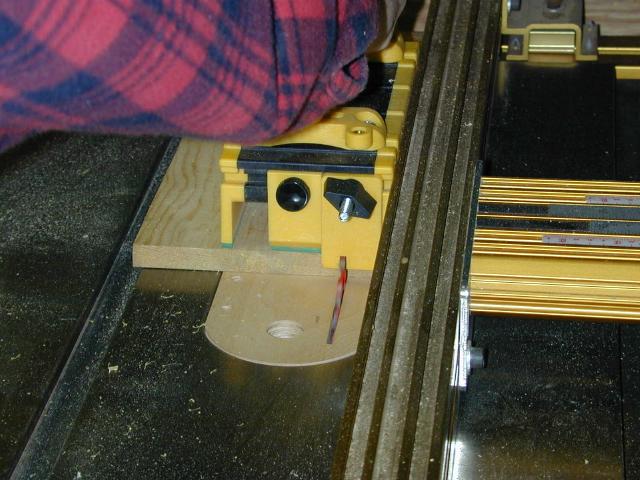
I
also used the MJ Splitter the entire time and it proved to work very well. One thing
you will want to do with the splitter is make a number of ZCI's and raise the blade
for some of your most usual cuts, like 2/4, 3/4 and 4/4 and one with the blade fully
raised. Why you do this is so that you can install the MJ Splitter right up near
the blade. The MJ Splitter will install about 3/4" behind the blade so if you
make only a ZCI with the blade raised to its max height, then when ripping a 3/4"
board, the wood won't contact the splitter until it passes about 2.5" past
the back of the blade (top right in photo below). Now make that same rip with a
ZCI/splitter installed when the blade was only raised high enough to cut 3/4, and
the work will contact the splitter about 3/4" behind the blade(top left in
photo below)...a more safe condition allowing for fewer things to go wrong and contact
that spinning blade.
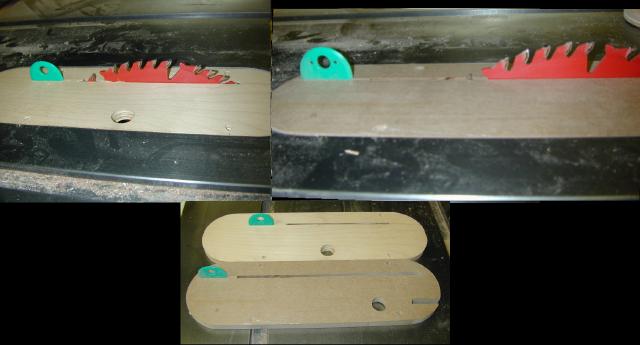
You can't use the drilling jig per the instructions when installing the insert
for a lower blade height. I simply slid the jig back so that the hole closest to
the blade was about 3/4" behind the kerf cut on the ZCI.
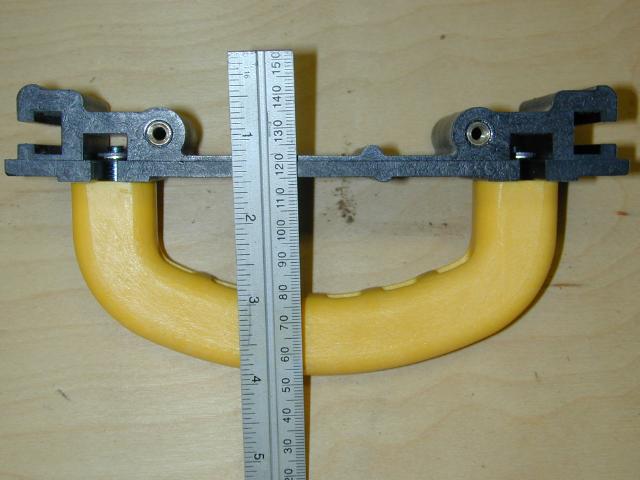
New GRR-Ripper Features
Micro Jig has come out with a couple of new features for the GRR-Ripper. You can
now purchase the MJ Handle Bridge Kit which includes the bridges and a trailing
hook.
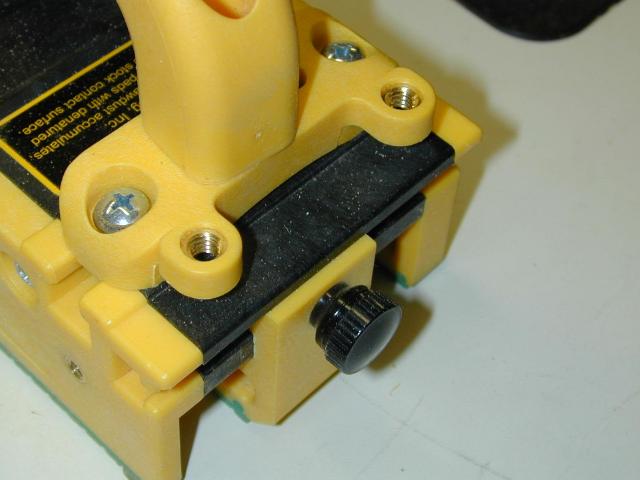 The
handle bridges are a pair of plastic arches which are attached by T-nuts to the
main body of the GRR-Ripper(left). The bridges provide four contact points for the
handle instead of the original two and better distribute the pressure on the rubber
pads. The handle bridge allows the GRR-Ripper to exert a more even pressure on the
work. By using the handle bridge you no longer need to reposition the handle in
order to get better pressure on the work.
The
handle bridges are a pair of plastic arches which are attached by T-nuts to the
main body of the GRR-Ripper(left). The bridges provide four contact points for the
handle instead of the original two and better distribute the pressure on the rubber
pads. The handle bridge allows the GRR-Ripper to exert a more even pressure on the
work. By using the handle bridge you no longer need to reposition the handle in
order to get better pressure on the work.
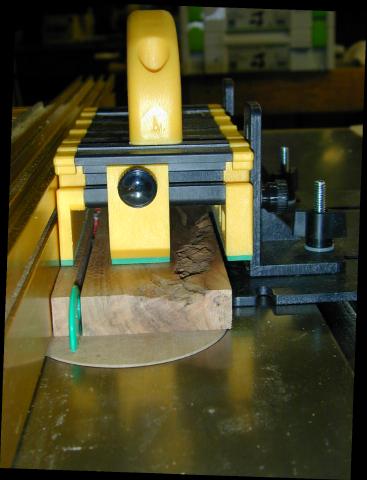
By adjusting the handle so it is angled across the body of the GRR-Ripper as shown
in the photo at right, I'm able to apply both down pressure and force towards the
fence. The action of pushing the work naturally applies force towards the fence.
This angle is also very comfortable.
 The next set of photos will show the
trailing hook in use during a number of operations. The hook is simply a piece of
the same material as the GRR-Ripper, a T-bolt, washer and knob (left). The hook
slides onto the GRR-Ripper (right) using the T-bolt and track and is tightened down.
The next set of photos will show the
trailing hook in use during a number of operations. The hook is simply a piece of
the same material as the GRR-Ripper, a T-bolt, washer and knob (left). The hook
slides onto the GRR-Ripper (right) using the T-bolt and track and is tightened down.
[edit 2/19/5] One thing I missed on the first go round was that Micro Jig recommends
using the included trailing hook as a template for DIY hooks. That way when using
them on a table saw, if they get cut up you simply grab or make a new one.
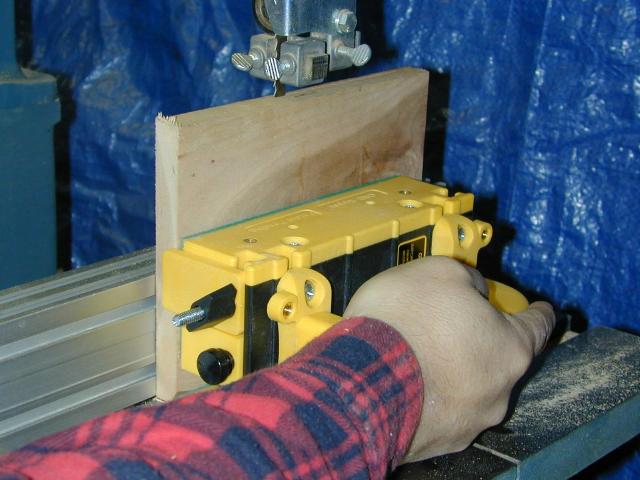
 At
left you can see the hook being used on the table saw and on the right on the band
saw. I think it is especially useful on the bandsaw as it keeps your fingers out
of the way without having to apply too much sideways pressure to the GRR-Ripper.
At
left you can see the hook being used on the table saw and on the right on the band
saw. I think it is especially useful on the bandsaw as it keeps your fingers out
of the way without having to apply too much sideways pressure to the GRR-Ripper.
 The
last picture in the group is using the GRR-Rippers and the hook on the jointer.
This aids in feeding the work especially when the top side of the board is still
rough.
The
last picture in the group is using the GRR-Rippers and the hook on the jointer.
This aids in feeding the work especially when the top side of the board is still
rough.
By the way, don't be afraid to make your own custom hook out of hardboard or ply
if you need it to be longer.
All in all I think this is a worthy addition to your GRR-Ripper arsenal and from
the looks of the threaded inserts in the handle bridges, more attachments are in
the works.
Copyright © 2004-2005, Bill Esposito.
All Rights Reserved.