3.25hp Plunge Router
a review by
Bill Esposito
11 Jan 2003
The Market Survey... I wanted a big router. I wanted it bad. I had ruled
out the Freud and Hitachi for various reasons and set my sights a bit higher into
the $300-$350 range. What I found there was the Bosch 1619evs, the new Milwaukee
5625-20, and the Australian Triton TRC-001. I had been waiting for the Milwaukee
figuring I'd get the big brother to my 5615-20 Body Grip, but it was November 10th
and the Milwaukee was nowhere in sight. I knew the Bosch was a proven performer
and couldn't go wrong with it. But ever since I'd seen the Triton last summer in
a magazine, I had a secret yearning for it.
The Decision...After going back and forth in my mind, searching the newsgroups
and message boards, I finally decided on the Triton. It does after all, have the
coolest depth mechanism this side of the equator...and the other side as well! It
allows one handed bit changes from above the table, and its chock full of safety
features. It was a no brainer, I got out my credit card and clicked the Amazon.com
URL.
Cold Feet... Ok, as soon as I clicked the order button I started having doubts.
First, I had actually never seen or felt this router...suppose it was a piece of
junk? I had also read some newsgroup messages which discouraged its use as a hand
held router because of its balance. It also has feature which had escaped me before,
a 1/4" reducer for the smaller bits. And lastly, service. I just spent $300
on a router whose parent company was on the other side of the world, and whose US
operation was only a few months old as far as I could tell.
Communications with Oz... It was Sunday afternoon on November 10th and I
decided to email Triton and pose my questions and concerns. Within a couple of hours
I received an email from Triton stating that they had forwarded my technical questions
to the engineer responsible for the router, and my service and warranty questions
to Triton USA. By 5:15 that same
day I received my first email from Graham, the engineer, answering my questions.
I wrote back and we exchanged a few emails and I was satisfied with all his answers.
To my surprise on monday morning at 11:40am I received an email from Mark, General
Manager of Triton Workshop Systems USA,
and we began our own exchange of emails. I was still having cold feet, not because
of service or anything else, but because I still had never seen the router and Amazon's
return policy states that unless the returns are defective, they must be in new
condition. I had to leave on a business trip so I canceled the router from Amazon
and got on my airplane. Mark and I continued our email exchange and then finally
spoke on the phone. Mark assured me that I would like the router and offered to
take it back if I didn't. I ordered the router from him and it was on my doorstep
two days later when I returned home.
I tell you all of this because both you and I know that just as important as a tool's
performance, is the performance of the manufacturer's customer support, and in my
book Triton Workshop Systems has exhibited first rate customer support. Now on with
the review!
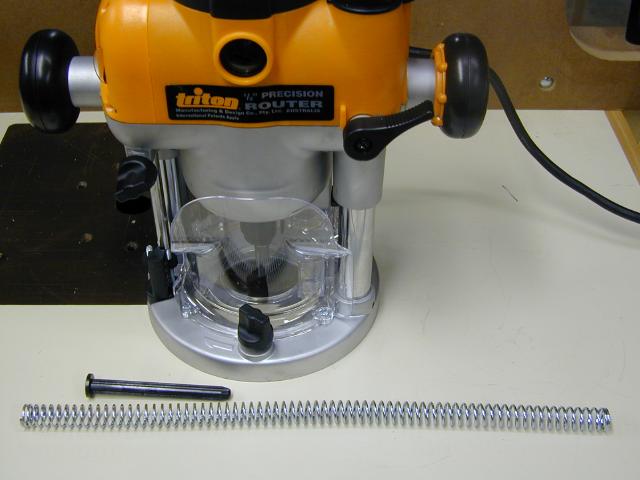
Features and Specs:

You get the router, edge guide, wrench, 1/4" reducer, a 1/2" straight
bit, and the instruction manual. Everything was packed fine and arrived safely.
Starting from the top, speed is controlled by this wheel.

It is marked 1 through 5 and there are no positive detents so the numbers are
to be used as a guide only.
1=8,000rpm
2=10,000rpm
3=14,000rpm
4=18,000rpm
5=21,000rpm
Right below the speed control is one of the brush access covers. Both brushes are
easily replaced.

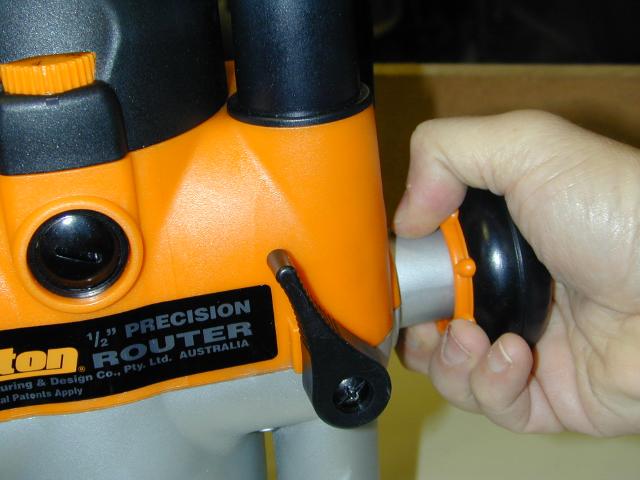
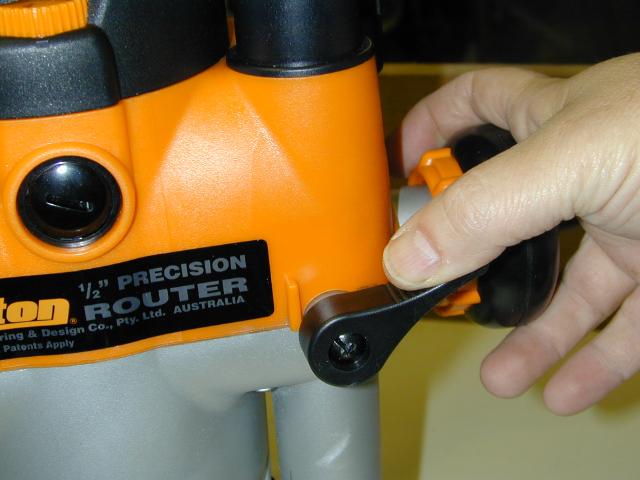
The lever to the right and below the brush cover is the plunge locking lever. Once
you've set your depth make sure to lock the router. The position of this lever can
be changed to suit the user.
The next picture shows the fine adjustment knob. Once you've used the winder on
the right handle to adjust your gross depth, you can fine tune it by twisting this
knob.

Speaking of the winder, this next series of pictures illustrates the operations
needed to adjust the depth. First, while grabbing the handle, you squeeze the ring
to unlock the handle and allow it to turn.

Turning clockwise plunges the router while counterclockwise raises it. Once you've
set your depth, release the ring and the handle will lock.
You can then use the fine adjustment knob for that last little tweak and then lock
everything up by setting the locking lever. While not a killer feature, it's clear
the engineers at Triton were thinking of ergonomics when they designed the router
because they've designed the locking lever so that you can adjust its position to
your liking. So far I've left it in its default position.
While we're talking about setting the depth, lets look at the free plunge mode.
In this mode, the Triton works like a conventional plunge router. What we have to
do now, is disengage the rack and pinion assembly. To do that all you have to do
is twist the winder lock.

In this case, locking means that we will lock the winder handle so it can't rotate.
To do that, you simply twist the yellow plunge mode selector clockwise, then push
it in, and twist clockwise again till it stops. Once it's locked, neither the winding
handle or the fine adjustment knob have any effect on the router. You simply plunge
the router to the desired depth and then set the locking lever.
*Tip* I had some initial problem with this mechanism. While I could get it to lock
very easily, I was having a difficult time unlocking it. I sent an email off to
Triton and within a couple of hours received the reply. The reply instructed me
to apply slight pressure on the top of the router while unlocking the winder. This
is because two sides of the dog clutch are not in perfect
alignment and thus the clutch will not engage immediately. The slight pressure solves
the problem. This information was clearly provided in the instruction manual...but
who reads those right?
While using the router in the free plunge mode, you will want to take advantage
of the Triton's depth stop turret. This clever device allows you to dial in the
depth of your cut (you can set two different depths). The operation is actually
pretty simple.
1. With your bit installed, zero the router by plunging it until the bit just touches
the work piece (or tabletop) and lock it with the lever.
2. Next, adjust the depth nut to the desired depth, in this case, 1/2"

3. Rotate the turret so that the fixed turret post lines up under the depth stop
rod, and release the rod until it springs down and contacts the post. Then re-tighten
the depth stop rod.

4. Next rotate the turret again until the depth stop rod is aligned over the adjustable
post. The rod is actually a piece of tube so it will fit over the threaded rod of
the adjustable post and stop the plunge when it contacts the adjustment nut. The
Triton has two adjustable posts. You can just rotate the turret until you line up
the the post set for your current cut.

If you prefer to use a gauge block you can just rotate the turret to the fixed post,
and use your gauge block off that reference.
As long as we're talking about hand use lets not forget the included edge guide.
This guide is like nothing you've seen before. It's really an offset router baseplate
which doubles as an edge guide and circle cutter.
Attaching the Guide is a snap. You simply loosen the two spring loaded thumbscrew
bolts and slide the guide onto the router base.
The actual position of the edge guide is adjusted by thumbscrew action also as seen
below.
I added a knob to the guide to provide more stability and turn it into an offset
base.


The edge guide has a design flaw which can affect you when edging. By its design,
the guide has a channel running down the center of it. When you are putting a profile
on the edge of a tabletop for instance, as you reach the end or corner, if you are
not careful the router will drop into that channel and ruin your profile. I solved
this flaw by double-stick taping a piece of 3/16th shim into the channel. This fix
does not affect any other mode of operation of the guide, but prevents the problem
described above.

Hand Held Use:
Although I purchased this router for table use, I have run some hand held test passes.
The first thing I noticed was the soft start. I've never owned a router with soft
start before and the Triton's is a pleasure to use. I swear that I feel less torque
during operation while using the Triton than I do my Milwaukee Body Grip, and because
of the soft start, I feel more comfortable using the big Triton than the Milwaukee.
The built in dust collection is great and made cleanup after the tests a cinch.
The dust collector picked up better than 80% (very unscientific measurement) of
the sawdust produced although routing with a dust hose attached takes some getting
used to.
While I was very concerned about the router being top heavy, that is not the case.
The router feels just fine and is not top heavy at all. You may experience some
instability if you dont use the guide just because the handles are located about
2 inches higher than most other routers and you simply have better control with
a router whose handles are attached to the base and closer to the work.
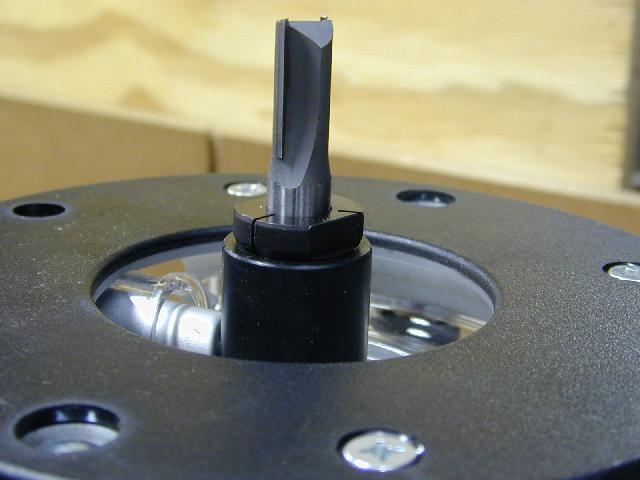
The Collet:
The Triton comes with a single piece collet and a 1/4" reducer.

Here's a shot of the collet and the included 1/2" straight bit.
Fir 1/4" bits, you must use a reducer. The old style reducer required you to
line up the slots in the reducer and collet for ease of bit release...that is no
longer required.

Here's a 1/4" bit inserted utilizing the reducer.
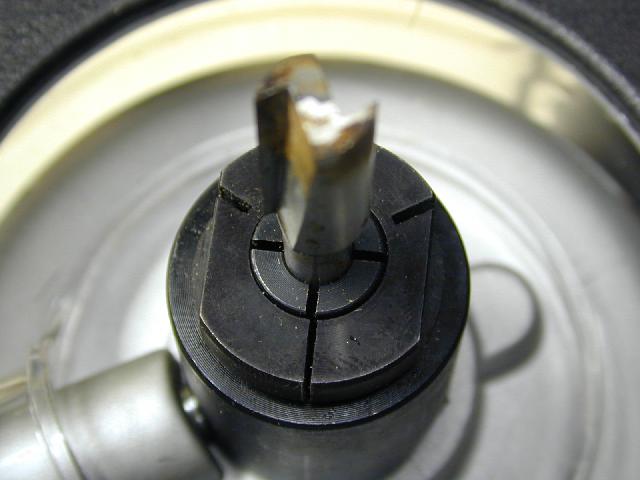
So far I have not experienced any problem with releasing either size bit and Triton
prides itself on that fact. Additionally the bits have stayed right where I put
them even after overloading the bit to try to force it to change position.
Shaft Lock
Tightening an loosening the collect is a one wrench operation. The Triton's shaft
will lock to allow one wrench bit changing. One of the many safety features of the
Triton is that the shaft lock mechanism and the power switch are interrelated. The
shaft will not move into the lock position unless the power switch is off, and the
power switch cannot be turned on again until the shaft is unlocked.
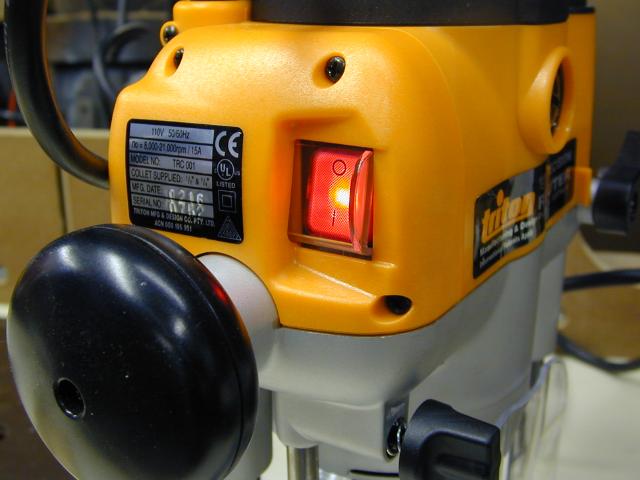
As long as we're on the subject of power switches, the Triton has a unique power
switch feature or two.
First, the power switch is lighted when power is applied. This provides a visual
indication of power.
Next, the power switch is located behind a sliding door. This prevents power from
being accidentally applied and also forms part of the shaft lock mechanism.
In this picture you can see that the power is applied, but the power switch is off
and behind that closed door.
Here the door has been slid open and the power switch is on.

Guide Bushings:
Triton Workshop Systems offers a guide bushing set for use with this
router. The bushings are very different than what you are used to for other routers.
Since the Triton router's dust collection system is optimized to work with an open
bottomed router table, using the normal PC style bushings would defeat the system.
So Triton WOrkshop Systems has designed a set of bushings which will allow the built
in dust collection to function normally. The bushings have slots which allow the
duct collector to draw the sawdust through the base.
The kit includes O.D.'s of 5/16, 3/8, 7/16, 1/2, 5/8, 51/64, and 21/32" with
the I.D.'s running from 1/4" through 3/4". Also included is an adapter
to allow you to use the standard PC bushings (just below the black ring in the picture)
and a spacer for use when the router is mounted in a table.

While I haven't tried the bushing set yet, It appears to be of high quality and
should work just fine.
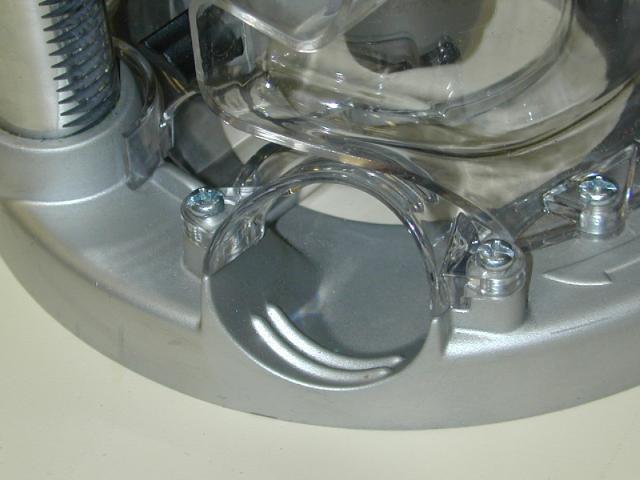
Preparation for use in a table:
The first thing you will want to do to prepare your Triton for table
mounting is to remove the plunge spring. If you leave the spring in, it and the
weight of the router will make it impossible to use the fine adjustment knob.
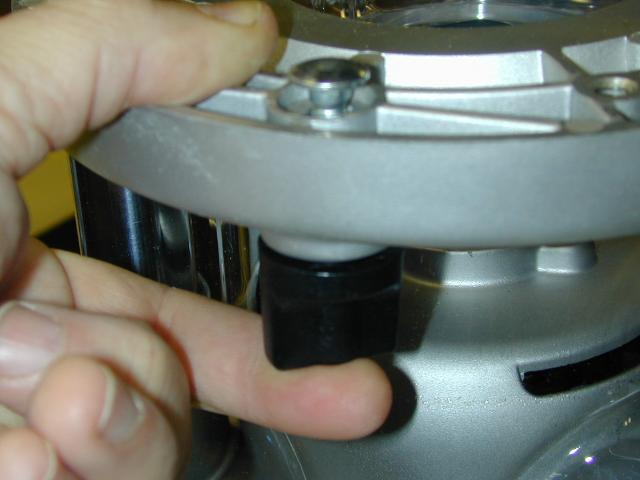
Removing the spring is easy.
1. With the router sitting on its base plate, use the handle to raise the router
to its fullest position. Doing this will relieve most of the tension on the spring.
2. Using a phillips screwdriver, loosen the screw which locks the spring cover in
place as shown below.

2. Maintaining a firm grip on the spring cover, twist the cover and remove it.
The spring and its plastic guide rod can then also be removed.

3. Replace the spring cap and re-tighten the retaining screw.

4. Store the spring and plastic guide rod in a place where you will be able to find
it again
The router is now ready to be mounted in your table.
** Tip ** If you plan on using some large bits and your technique for taking small
bites out of the work involves raising the bit through the base opening than you
may wish to remove the dust collection shroud. The Triton allows for 2-1/4 inch
bit to fit through the base plate opening with vacuum shroud in place and a 3 inch
bit with vacuum shroud removed.
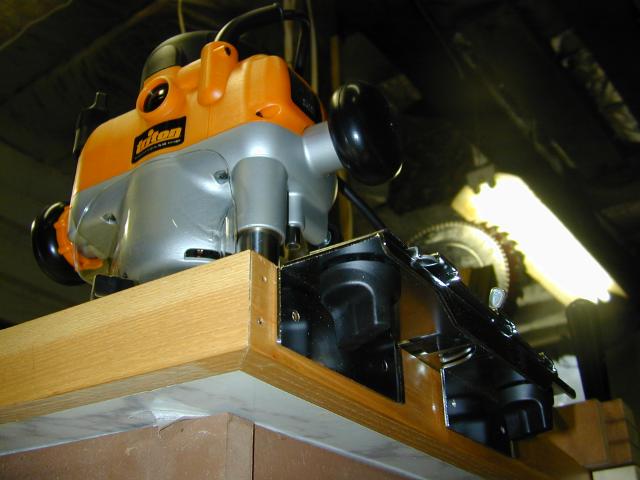
I mounted the Triton in my table utilizing a phenolic insert. The 1/4" insert
I used was not strong enough to handle the router without sagging. I still need
to make a new 3/8" insert.
The screws provided with the router are not long enough for even a 1/4" thick
insert so you'll have to procure new ones. Luckily they are standard 1/4" screws
and not metric. I removed the plastic base and mounted the router to the insert.
If you want to use the guide bushings, you mount the bushing plate to the router
and then the router to the insert. You may also have to use the guide spacer provided
with the kit.
In this picture you can see how much of the collet is exposed above the table for
bit changing. Bit changing is a breeze with the Triton.

Table operation:
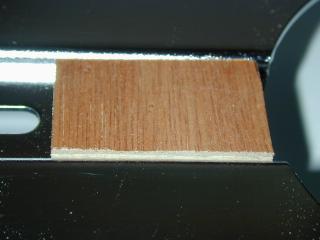
I used the above Freud panel raising bit to make a test raised panel out of hard
white birch. I made the profiles in three passes utilizing the fence to control
the size of each pass. I ran the router speed at the slowest setting of 8000rpm.
While I could hear the motor change pitch a bit when I pushed the work through,
the Triton and Freud bit performed flawlessly.
I also used the Triton in my miter station project to make 56 drawer lock joints
(length varied from 4" to 12"). I ran the bit at high speed and had to
vary the bit height about a dozen times because of the sequence in which I was working.
The fine height adjustment and lock worked great every time. I am very satisfied
with the height adjusting mechanism on the Triton.
Dust extraction. My table has great dust extraction capabilities so I did not test
the Triton's built in DC in the table mode. I did attach my shop vac to the router
when making test passes in hand held operation and the dust collector worked exceptionally
well. I presume that when the router is mounted on a Table Saw Wing that you should
see very little sawdust escape the Triton's dust shroud if you connect it to a shop
vac.
Below is a picture of the Triton's 1.5" dust hose port. You just screw the
hose onto the port.
Conclusion
I am quite happy with my Triton purchase. I am very impressed with the
level of technical and pre-sales support I received from both the partent company
in Austraila and by Triton Workshop Systems USA. The router is loaded with safety
features, has an excellent and unique height adjustment mechanism, easily removed
plunge spring, great built in dust collection, very smooth soft start, and enough
power to swing the big bits. The only negative I can see is the edge guide's design
which I had to get around with a shim. Would I buy it again? You bet!
11 January 2003
Copyright © 2003 , Bill Esposito.
All Rights Reserved.