a review by
Bill Esposito
12 May 2003
Have you been looking at the Delta or Craftsman Laser Miter Saws and wondering
how you could have a laser on your $600 Sliding Compound Miter Saw? The good
news is that you do have a couple of retrofit options. The bad news is that most
of them are expensive, and because they are installed on your blade arbor
only operate while the saw blade is spinning. I can only speak for myself
but the thought of adjusting the work piece to align the cut while the saw blade
is spinning doesn't sound like a safe thing to do. Also, because these laser
pointers install in place of the arbor washer, your retrofit options are limited
by arbor diameter and clearance under the blade guard. If for these reasons
you have been putting off the upgrade, I have some good news for you and it's called
Laserkerf.
Laserkerf, by Laserkerf of Georgetown Kentucky, is a reasonably priced
($79 msrp) laser guide retrofit kit which installs external to your blade housing.
It can be installed easily on most compound miter saws, sliding compound miter saws,
and even radial arm saws. It is also turned on and off by an external switch
so that you can make all you adjustments with the saw off, then get your hands out
of the way and make the cut.
Another unique feature of the Laserkerf is that the laser doesn't
just mark the cut line of one side of the blade, the laser beam is sized to exactly
match the kerf of your blade so it actually indicates both sides of the blade at
once. This means that the red line is accurately depicting what material will
be removed by the cut. Sure, you'll still have to remember which side of the
work piece is the waste side, but you will have the flexibility to align your cut
mark to either side of the laser line.
For the remainder of this article I will attempt to provide you with enough
detailed product information, step by step installation instructions, and product
testing to allow you to make a informed purchase decision regarding the Laserkerf.
The short answer is that I would certainly recommend the Laserkerf, but read on
and make up your own mind.
What's in the Box?
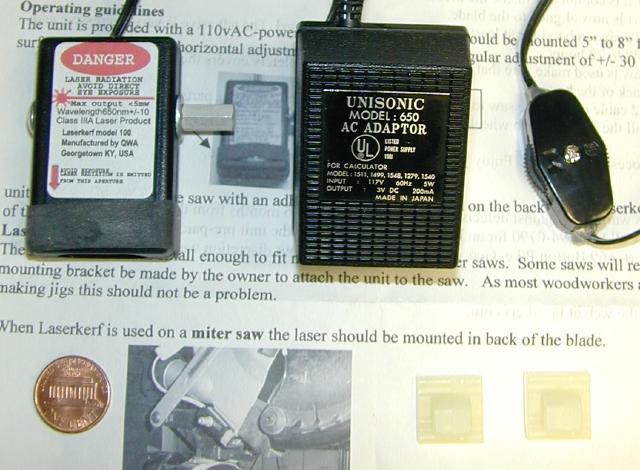
You'll receive your Laserkerf kit in a small box via the US Postal
Service. The basic kit without any added brackets is pictured at the right. It includes
(clockwise from left) the Laser module, power adapter, on/off switch, two self stick
cable retainers and an instruction sheet. (the penny's mine)
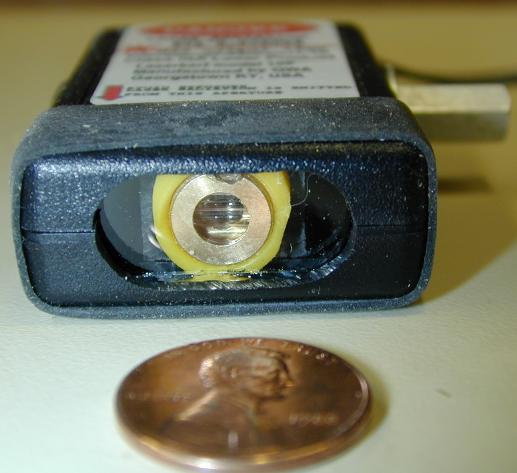
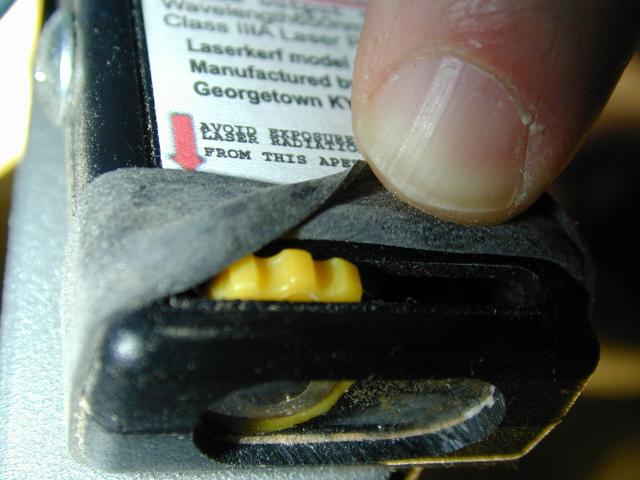
The laser module itself is quite small. In the photo at left you can see the
business end of the laser. The oblong cutout in the case is so that you can adjust
the position of the laser once mounted either left or right by twisting the hex
shaped post seen here on the right side of the laser module.
Another interesting thing to note is that the Laserkerf is installed
perpendicular to the work and not horizontal as shown here. If you were to hold
the Laserkerf in your hand and point is straight down, it would project a
line on the surface about 10" long.
Four Flavors to choose from!
The Laserkerf comes in two beam widths and two power options. You'll
recall what I said in the opening paragraphs, that the Laserkerf's beam can
exactly match your saw's blade kerf. You can order either the full kerf (1/8")
or thin kerf (3/32") size. If you swap between thin and thick kerf blades then
I'd suggest selecting the size which matches the blade you use the most often. Then
when you have the other blade in the saw, just adjust the Laserkerf so that
the beam lines up with one edge of the blade.
You can also buy the Laserkerf equipped to run on AC power or battery.
I can't imagine why you would need battery power but some woodworkers must have
asked for that option.
|
If you visit the Laserkerf
website and click on Laserkerf
kits & Installation Photos you
will see a display of some of the brackets that you can buy to aid in installation
as well as a list of saws and the type of bracket they need, if any. |
INSTALLATION:
The installation is fairly straightforward. The first thing you must
do is to create a shallow saw kerf to which you will later align the laser beam.
Find yourself a piece of wood 4" wide by 3/4" thick and clamp it
to your saw.
Next cut a shallow saw kerf, about 1/8" is plenty. If you cut it too
deep it will be more difficult to align the beam. Do not un-clamp or move the wood
until after the alignment process. This method of alignment assures that the laser
and the saw cut line up exactly.
Unplug your saw for this next operation.
With your saw in it's starting position, that is with the saw blade up and
for an SCMS the saw pushed all the way back, plug in the Laserkerf and turn
it on. **DO NOT LOOK INTO THE BEAM** Now try to position
the Laserkerf behind the blade guard in the position where you think you
want to install it. You want to find a spot where you can mount the Laserkerf
and be able to align it with the kerf you cut. In the picture below you can
see me testing the position of the Laserkerf. I wanted the laser's lens to
be shielded by the saw guard. To accommodate that I had to mount the Laserkerf
a little to the side.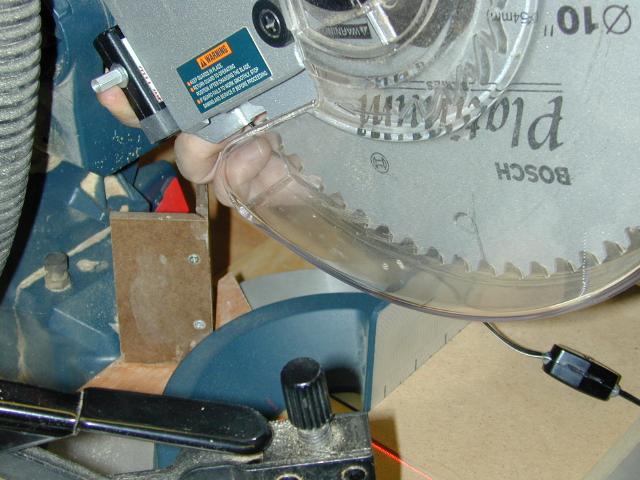 Notice
that I'm not trying to exactly align the beam, I'm just looking for a place to mount
the unit and have the beam close enough to the kerf so that I can adjust it in later.
You need to be +/- 1/4" left or right of the kerf and +/- 30° from parallel.
Once I found the spot, I turned the device off and cleaned the saw's mounting surface
with some alcohol. On some saws you may have to order or make a simple mounting
bracket. My Bosch 3915 did not require any bracket.
Notice
that I'm not trying to exactly align the beam, I'm just looking for a place to mount
the unit and have the beam close enough to the kerf so that I can adjust it in later.
You need to be +/- 1/4" left or right of the kerf and +/- 30° from parallel.
Once I found the spot, I turned the device off and cleaned the saw's mounting surface
with some alcohol. On some saws you may have to order or make a simple mounting
bracket. My Bosch 3915 did not require any bracket.
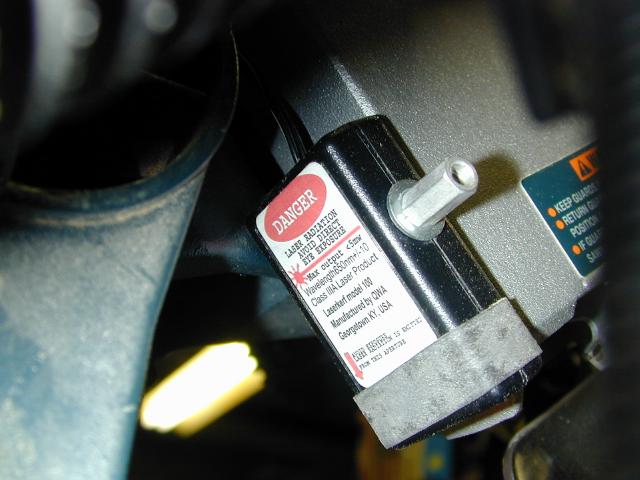
Now you're ready to mount the Laserkerf. For proper bonding and curing the
application temperature is 60° or higher. Make sure you thoroughly cleaned the
mounting location on the saw, peal off the backing and firmly mount the laser module.
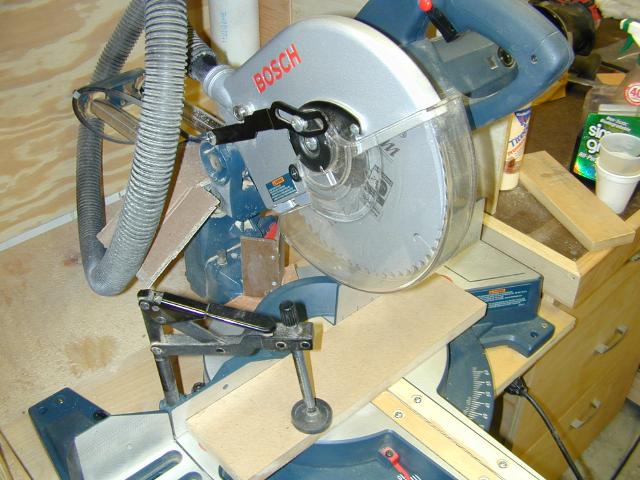
Here's how it looks mounted on my Bosch.
You could adjust the position of the beam now but it is my opinion that it is now
best to let the adhesive cure for an hour or two. The longer you let it cure (up
to 72hrs) before you mess with it or operate the saw the better the adhesive's performance
will be. Once I stuck it on, I waited an hour before I adjusted the laser and then
waited another couple of hours before I used the saw to make the test cuts.
ALIGNMENT:
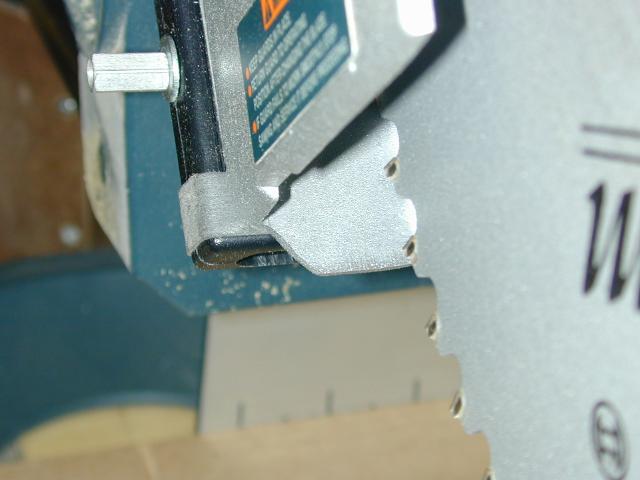
 This is a very easy operation. Simply turn the beam on and adjust the hex horizontal
adjuster (above left picture) and the angular adjuster (right) until the beam falls
exactly in the kerf. Now is a good time to talk about that black rubber band. Make
sure that when you are finished adjusting the beam the elastic band complete covers
the openings in the module body.
This is a very easy operation. Simply turn the beam on and adjust the hex horizontal
adjuster (above left picture) and the angular adjuster (right) until the beam falls
exactly in the kerf. Now is a good time to talk about that black rubber band. Make
sure that when you are finished adjusting the beam the elastic band complete covers
the openings in the module body.
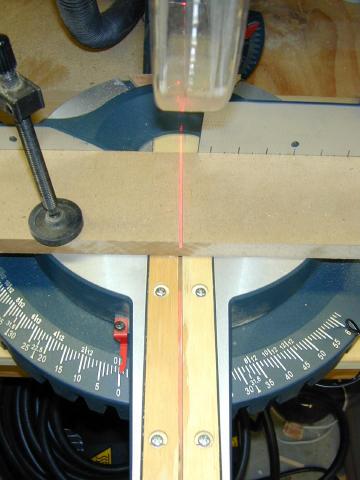
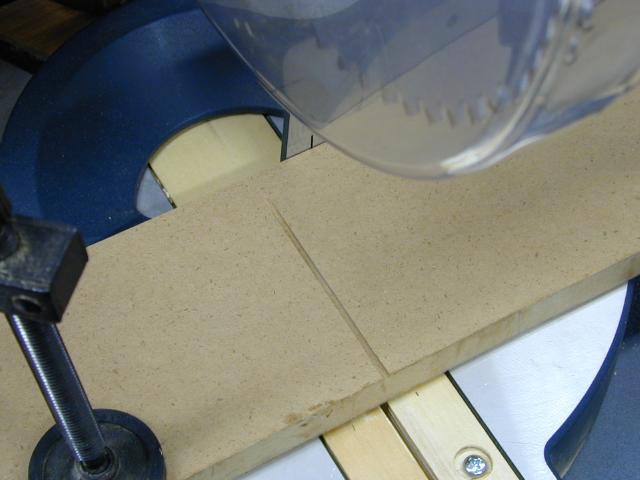
At left you can see the finished alignment. The laser is dead center in the kerf.
Also notice how far the beam extends forward. The insert in my saw is zero clearance
and if you look closely you can see the read beam extending all the way to the front
of the saw and remaining in the center of the kerf.
Now if you can suppress your enthusiasm, turn off the laser and let it sit
over night to cure.

I finished the installation by mounting the switch on the saw handle using
some double stick tape and then routed the wire through the existing clamps to the
outlet. Your kit includes two self stick cable clamps for this purpose if you need
them.
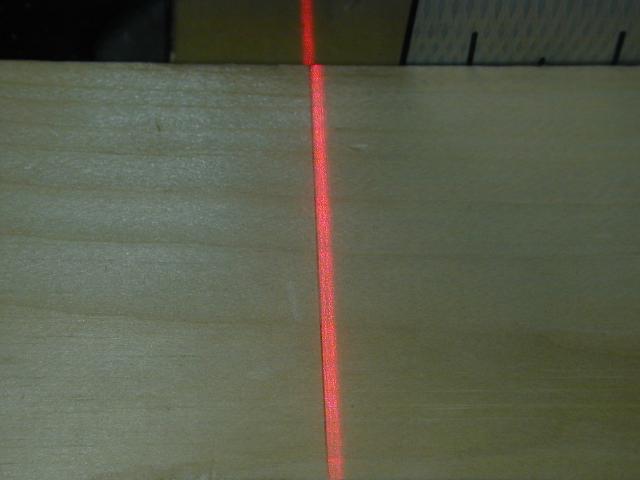
Before we get into the testing, at left is a photo of the laser beam being
aligned with a thin pencil mark.
You can see from the picture that it's pretty easy to sneak right up on a
thin pencil line and as I'll show in the tests, even split or bury the line with
the Laserkerf.
Putting the Laserkerf through some tests:
I decided that I would try to duplicate the accuracy tests that are found
on the Laserkerf website.
I ran the tests twice with similar results. I found that the accuracy of the cuts
is most dependent on how careful the operator is when aligning the beam to the mark.
Just like when one uses the standard touch the tooth to the pencil line method,
if you rush and dont get it right it's not going to be accurate.
For the test I drew a half dozen very thin pencil lines on a piece of wood.
The goal was to test the Laserkerf's accuracy to the blade as well as my
ability to accurately line up the laser beam while using my $7.50 Walmart eyeglasses.
Here are the results.
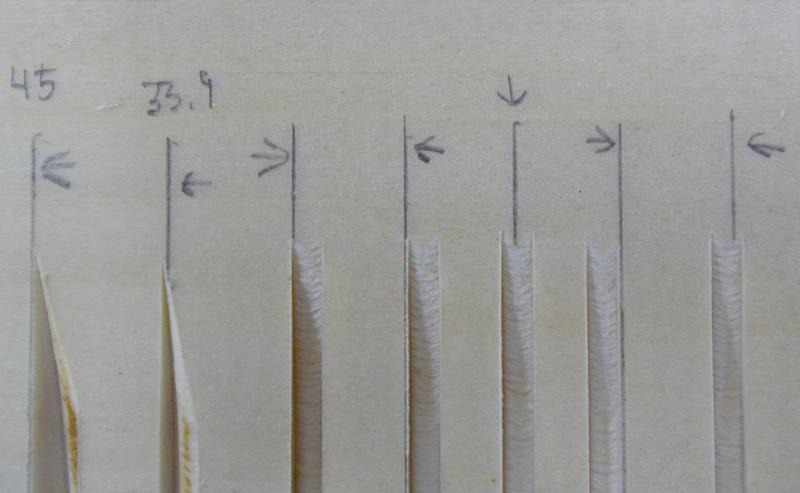
All cuts are at a 90° miter. From left to right:
1. 45° bevel, left side of blade - leave the line
2. 33.9° bevel, left side of blade - leave the line
3. No Bevel, left side of blade - bury the line
4. No Bevel, left side of blade - leave the line
5. No bevel - split the line
6. No bevel, right side of blade - leave the line
7. No bevel, right side of blade - bury the line
You will notice that cut # 2 and #7 are a bit off. The first pass I took
of the test cuts were all right on. I attribute this to the operator (me) rushing
the cut and not being careful. I could have redone the set of cuts but my intent
was to show you the results I got being reasonably careful.
Since performing these tests I have utilized the Laserkerf for making
a sofa table for my daughter and I really like using it. For instance, rather than
use a stop when making my apron and cleat pieces, I simply cut the first one to
length, then laid that piece on top of the next one, aligned the laser beam to the
edge, and made the cut. It was very quick since I only needed two of each size.
I also needed some corner braces for a clamp rack. So I cut some 5" squares
and aligned them corner to corner under the beam and clamped them to the saw. I
then made perfect diagonal cuts between the corners.
All in all I'd say that the Laserkerf is a great and inexpensive addition
to my SCMS. The accuracy can be dead on if the operator is careful. For rough cuts
it's a great time saver. Drawbacks? Just one. I found myself leaving the Laserkerf
on because I was so involved with the project. The stated life span of the laser
is 5000 hours so this probably isn't really a problem but it would be nice if the
Laserkerf automatically timed out after 5 minutes.
Laserkerf
669 Burton Pike
Georgetown, KY 40324
(859)494-0790
www.laserkerf.com
[Home]