Festool Domino
DF 500 Q
Domino Joiner![]() Set
Set
Cutter & Domino Tenon Assortment Systainer
by
18 Feb 2007
When I first heard of the Domino I briefly looked at the description and didn't pay any more attention to it. To me the Domino seemed to be another biscuit joiner and even though I own one, I was never a fan of them. Then Fine Woodworking Magazine published a web article on the Domino and the author used the Domino to make floating tenons for a small table. Well that piqued my interest. A lot of what I've been making in my hobby has been small tables and I usually use mortise and tenon joinery which tends to be time consuming for me. I started doing more research on the Domino and getting more and more excited in anticipation of the 1 April 2007 U.S. release date. Well, I got my hands on one thanks to Christian O. at Festool USA and I had just started preparing the stock for a cherry coffee table so the timing was perfect.
Like all my reviews this one will be loaded with detailed pictures and explanations of all the features and controls of the Domino and as usual you can click on any picture to display a larger version. I'll also have a few movies where appropriate to better demonstrate the Domino. I'll document how I used the Domino in the construction of a coffee table where it is used for all the apron/stretcher joints as well as the table top glue up and since this is a first time use of the Domino for me, I'll pass on any hints or warnings that I discover along the way.
What's in the Box?
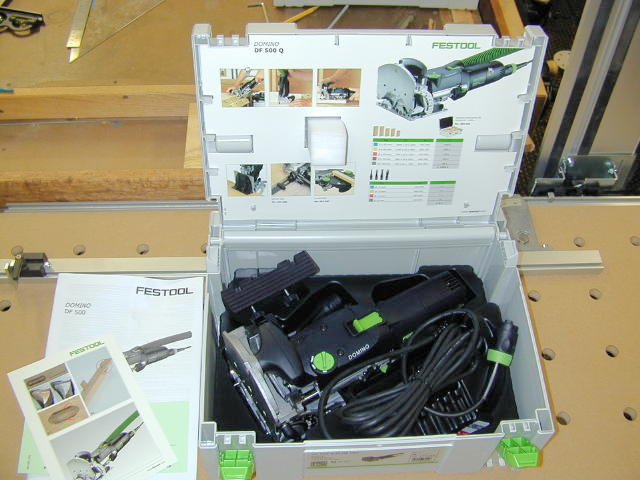
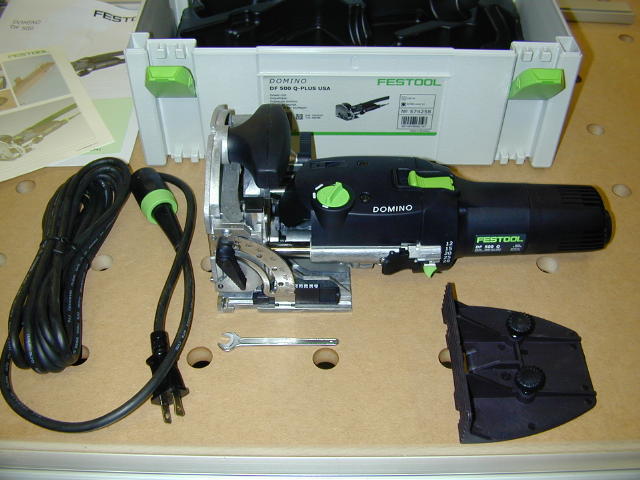 The
Domino DF 500 Q Set is shown in these two photos. The Domino
Systainer (left) contains the Domino, Plug-It power cord, support bracket,
wrench and documentation. Festool has had some problems in the past with
tools bouncing around in the Systainers during shipment but I saw no evidence of
that with the Domino.
The
Domino DF 500 Q Set is shown in these two photos. The Domino
Systainer (left) contains the Domino, Plug-It power cord, support bracket,
wrench and documentation. Festool has had some problems in the past with
tools bouncing around in the Systainers during shipment but I saw no evidence of
that with the Domino.
 In the same shipping box will be the rest of the set which consists of the
Cross Stop and Trim Stop (right), with included instructions. As with the
Domino, we'll get into their use a little later in this review.
In the same shipping box will be the rest of the set which consists of the
Cross Stop and Trim Stop (right), with included instructions. As with the
Domino, we'll get into their use a little later in this review.
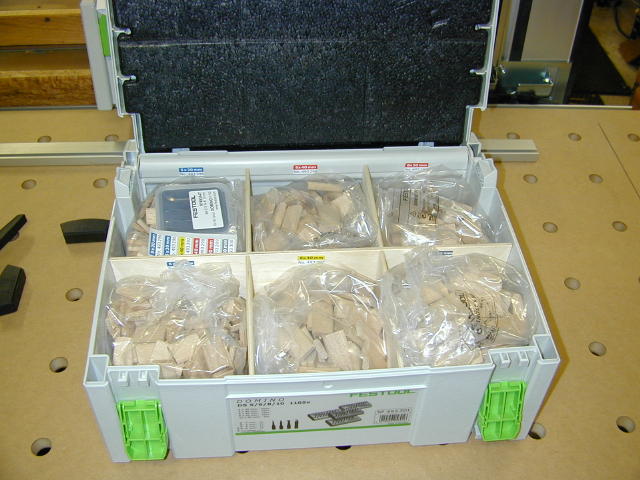
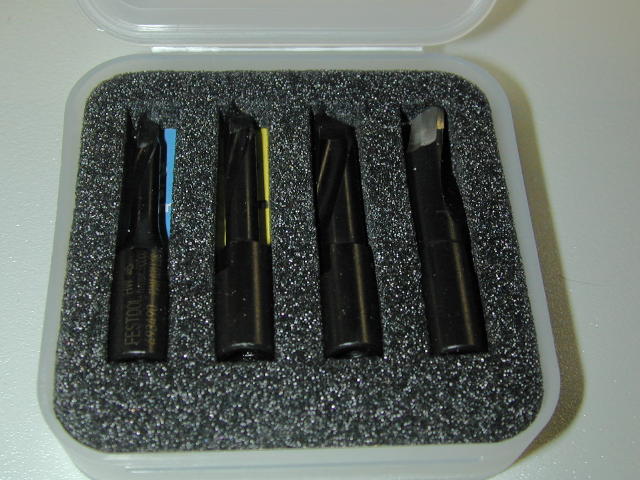 If
you want to use the Domino you'll need some Domino tenons and their respective
cutters. The best way to get everything needed is with the Cutter & Domino
Tenon Assortment Systainer (left). Packaged in a #2 Systainer,
this set includes all four of the Domino cutters (right) plus an assortment of
1105 Domino tenons. Festool also included an extra set of labels for the
tenons in case they wear off or you decide to make your own storage unit.
If
you want to use the Domino you'll need some Domino tenons and their respective
cutters. The best way to get everything needed is with the Cutter & Domino
Tenon Assortment Systainer (left). Packaged in a #2 Systainer,
this set includes all four of the Domino cutters (right) plus an assortment of
1105 Domino tenons. Festool also included an extra set of labels for the
tenons in case they wear off or you decide to make your own storage unit.
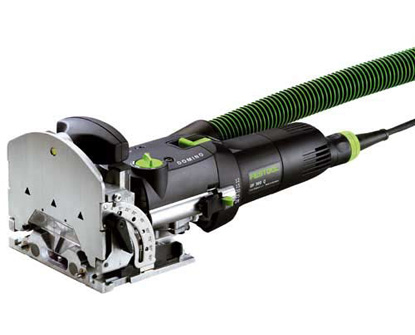
The Domino:
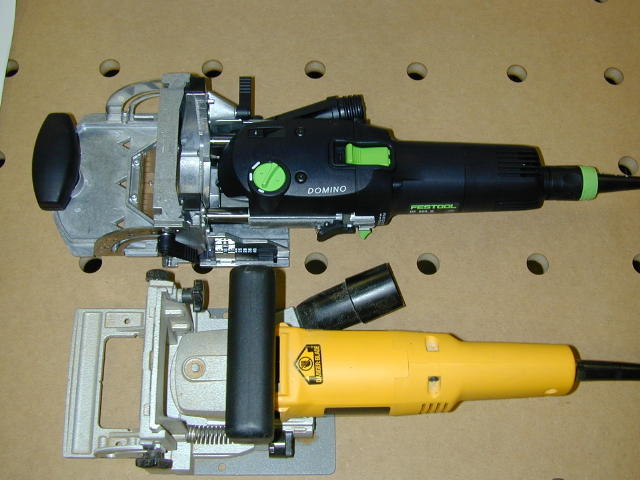
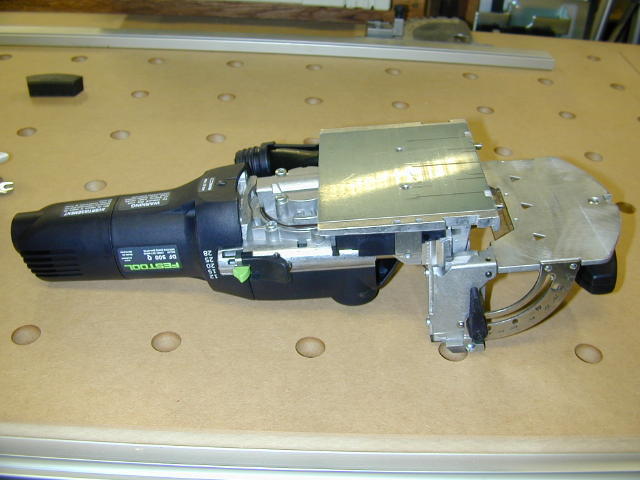
 Ok, I'm
only going to make a couple of comparisons to a biscuit joiner and this one is
only to show you the relative size of the Domino to a Dewalt joiner...something
you can go to Home Depot and put your hands on. As you can see in the
picture the Domino's body is slightly thicker at the handle or grip section.
The Dewalt is just a little lighter a 6.8 lbs vs. the 7lbs for the Domino.
Ok, I'm
only going to make a couple of comparisons to a biscuit joiner and this one is
only to show you the relative size of the Domino to a Dewalt joiner...something
you can go to Home Depot and put your hands on. As you can see in the
picture the Domino's body is slightly thicker at the handle or grip section.
The Dewalt is just a little lighter a 6.8 lbs vs. the 7lbs for the Domino.
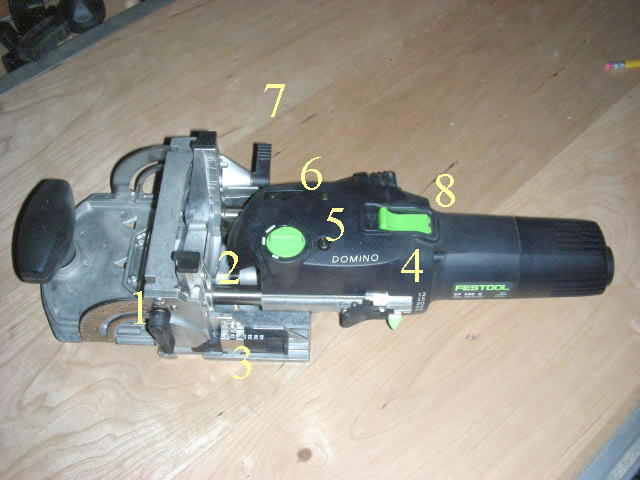
Please click on and enlarge the photo on the right for a reference to the controls as I explain them below.
Item No. 574258 includes, the DF 500 Q Domino
Joiner :
(1) DF 500 Q Joiner
(1) D5 Domino cutter
(1) Support bracket
(1) Operating wrench
(1) Systainer 2
Item No. 574283, the DF 500 Q Domino Set includes all of the above plus the Trim Stop item no. 493487 and Cross Stop item no. 493488.
Specifications
| Power | 420 watts |
| Speed/Swivel | 25,500 rpm/ 15HZ |
| Jointing Depth (max) | 28 mm |
| Jointing Width (max) | 23 mm + Joiner bit diameter |
| Jointing Bit Diameter (max) | 10 mm |
| Drive Shaft Thread | M6 x 0.75 |
| Weight | 7 lbs |
| Degree of Protection | Class II (Double Insulated) |
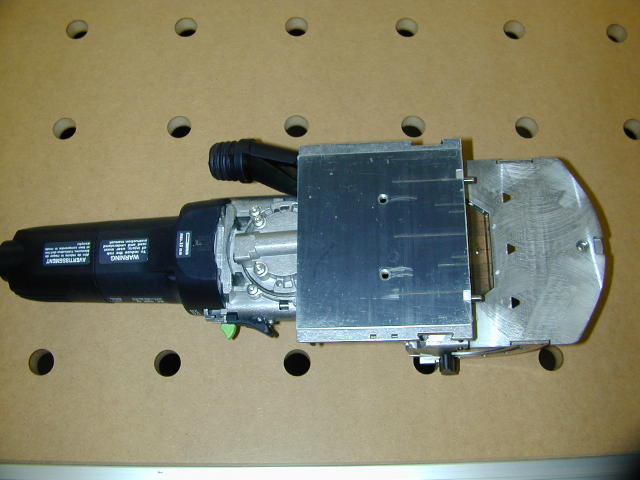
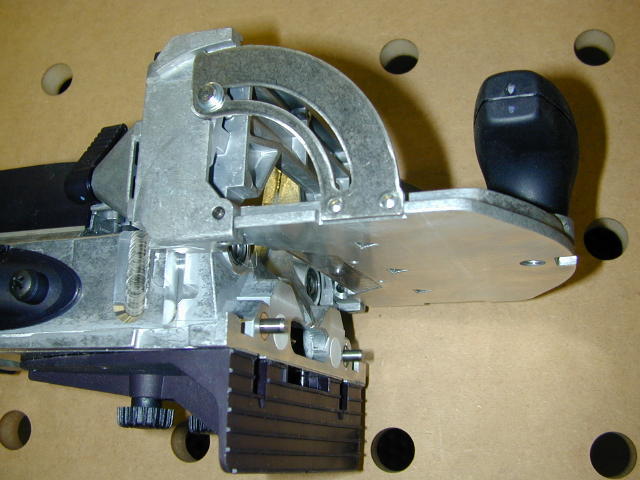
These bottom views of the Domino show the dust port (top of photo at left) and the scribe lines on the base of the unit to aid in aligning your work.
Domino Controls:
 Ok,
lets start looking over the controls of the Domino. Starting at the front
is the fence, its operation is similar to the ones on biscuit joiners.
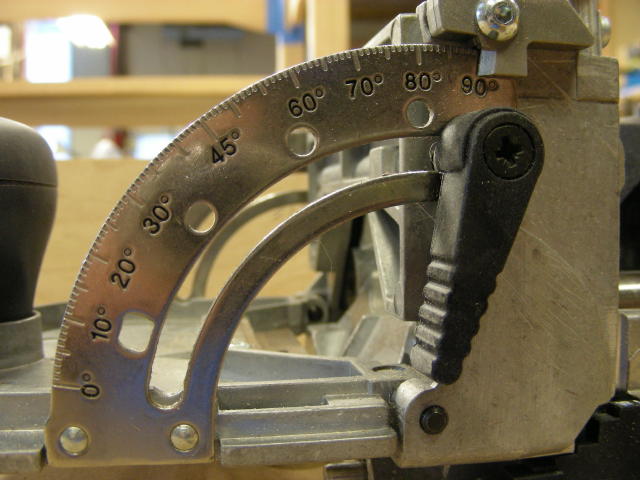
At left is the angle scale (#1 on the
reference picture from above) with ball bearing detents and locking lever.
The detents are positioned at 0°, 22.5°, 45°, 67.5° and 90°. The picture
at right shows the height locking lever (#7) which is located behind the fence on the
right.
Ok,
lets start looking over the controls of the Domino. Starting at the front
is the fence, its operation is similar to the ones on biscuit joiners.
At left is the angle scale (#1 on the
reference picture from above) with ball bearing detents and locking lever.
The detents are positioned at 0°, 22.5°, 45°, 67.5° and 90°. The picture
at right shows the height locking lever (#7) which is located behind the fence on the
right.
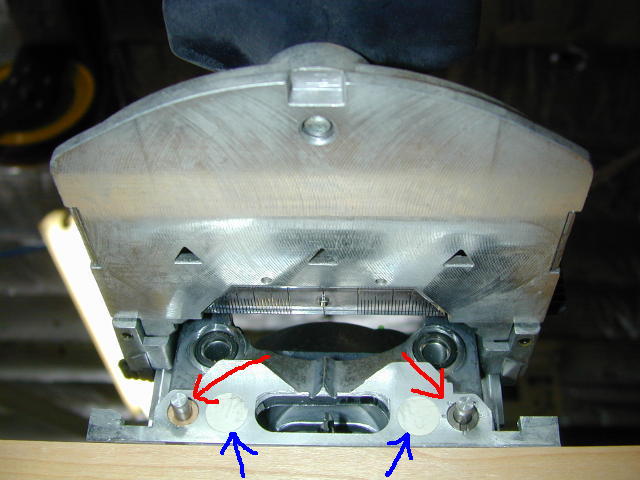
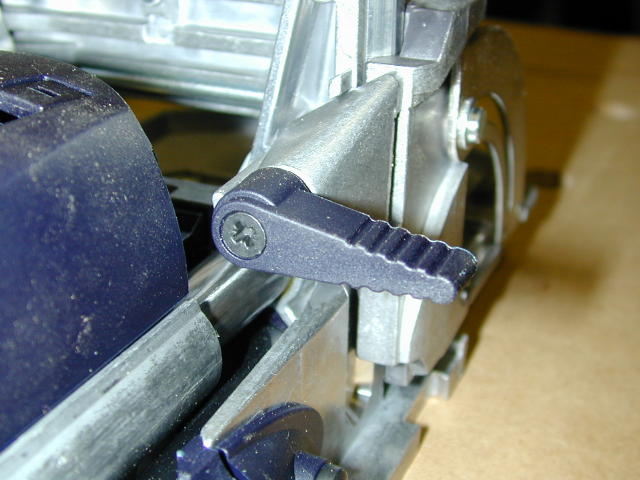
The photo on the left is looking at the business end of the Domino. Notice two spring loaded guide pins (left pic, red arrows). These pins can be used to index the Domino off a mortise or the edge of the work. Apparently there can be some slight variation where the distance between one pin and the center of the mortise is slightly different from the other, probably caused by tolerances in the swivel mechanism for the bit. If you notice that this is the case the left hand pin (on the right as you look at the front of the Domino) can be adjusted slightly. There is an eccentricity adjustment on that pin (see photo at right) which can be adjusted to achieve equal distance of the two pins to center.
Also in the photo at left the blue arrows
point to the friction pads. These pads help prevent the Domino from moving
when pressed up against the work.
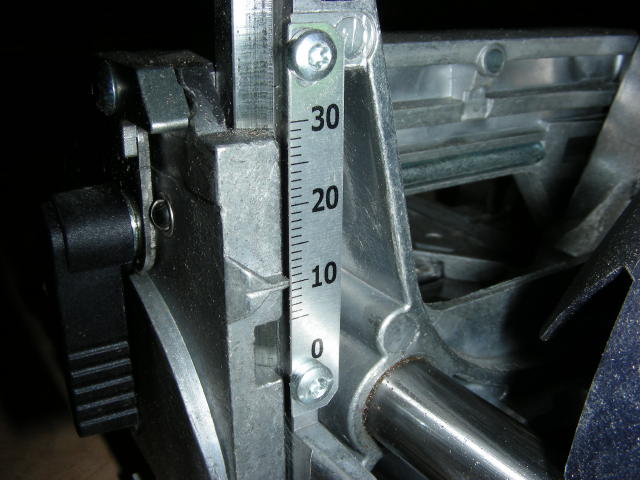
 Near
the fence angle lock and on the rear of that post is the fence height scale (#2).
This scale indicates the distance between the fence and the center of the bit.
You will see and hear me talk about setting the step gauge for some value, lets
say 25mm, but that means that the indicator will be aligned with 12-1/2 on the
fence scale...half the value of the step gauge.
Near
the fence angle lock and on the rear of that post is the fence height scale (#2).
This scale indicates the distance between the fence and the center of the bit.
You will see and hear me talk about setting the step gauge for some value, lets
say 25mm, but that means that the indicator will be aligned with 12-1/2 on the
fence scale...half the value of the step gauge.
Why half the value? Because the step gauge value represents the stock thickness, so if the stock is 25mm thick, the center of the stock is at 12-1/2mm so that is what is displayed on the fence scale. When your stock thickness is not one of the preset steps, you simply divide the measured thickness by 2 and set the fence using the scale.
The fence also includes a viewing window
(right) which is used to facilitate aligning the Domino to your work. I
have used this to center the Domino on a pencil mark and I have used the scales
to the left and right of center to center a piece without having to mark it.
Your Domino may need to have its viewing window scale calibrated.
Instructions for that procedure are included in
Rick Christopherson's excellent
Domino manual.
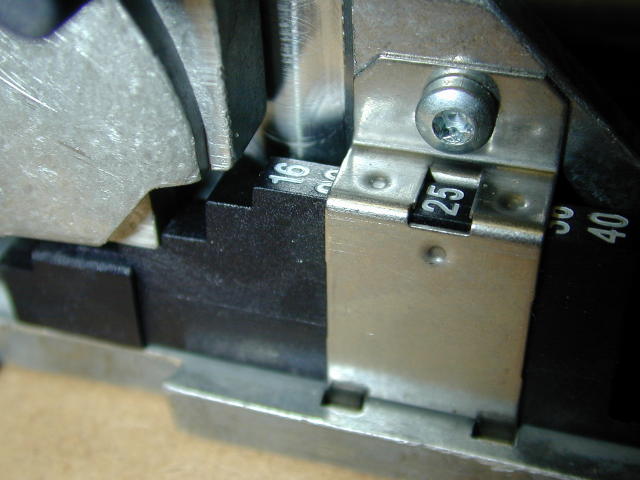
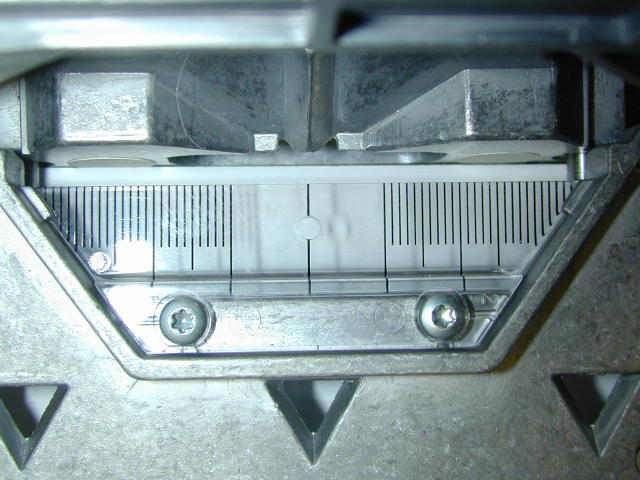
 The photo at left shows the selection window
of what Festool calls the height selection slide (#3)...I
call it a step gauge. There are preset steps for 16mm, 19mm, 22mm, 25mm,
28mm, 36mm and 40mm. The picture on the right shows the fence resting on
the 25mm step (highlighted in red).
The photo at left shows the selection window
of what Festool calls the height selection slide (#3)...I
call it a step gauge. There are preset steps for 16mm, 19mm, 22mm, 25mm,
28mm, 36mm and 40mm. The picture on the right shows the fence resting on
the 25mm step (highlighted in red).
On my unit I was initially having trouble placing the mortise at the exact center and then I noticed that fence scale was about a millimeter off from the step gauge. To remedy this I set the gauge at 20mm and positioned the fence. I then loosened the two Torx head screws which secure the fence scale and realigned the scale to the pointer.
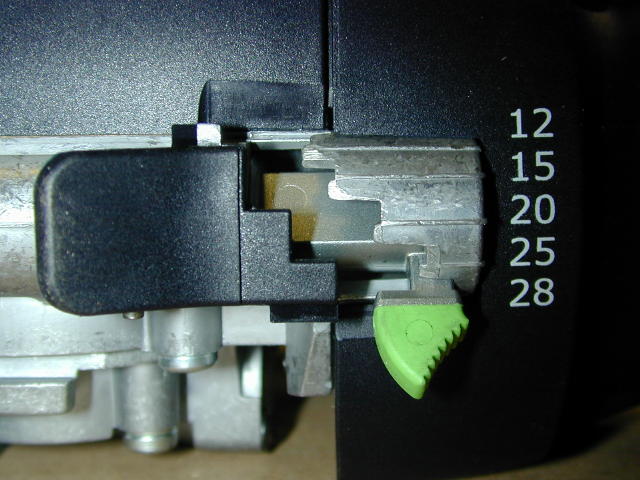
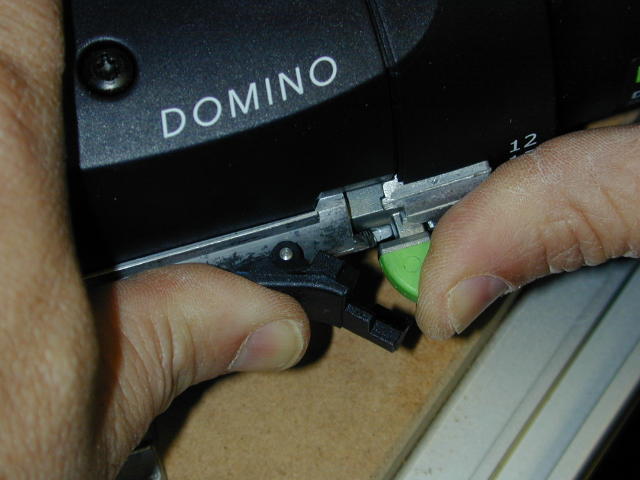
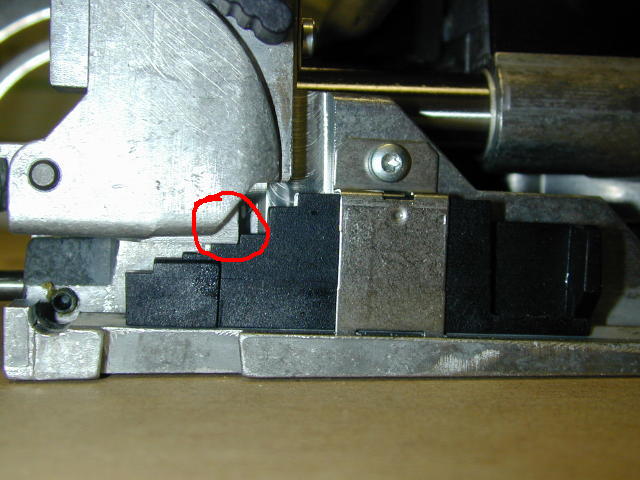
On the same side of the Domino just to the
rear of of the depth step gauge is the adjustment for milling depth (#4).
There are two levers as shown in the picture on the left. In that photo
the he far left lever is the locking lever and it must me depressed in order to
move the notch lever which is the green one to its right. This operation
requires two hands (photo on right) and can set the milling depth to any one of
5 depths, 12mm, 15mm, 20mm 25mm and 28mm. With these depth selections and
the various length tenons you can have your mortises of equal depth on each
piece or offset if needed. Festool took care of sizing the tenons a
little shorter than their advertised length to allow room for glue so you can
feel safe milling 25mm mortises for a 50mm tenon.
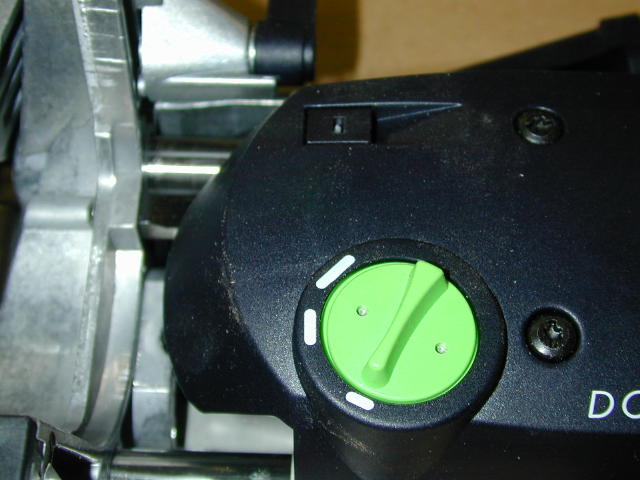 The
final adjustment control we'll need to make our mortises is the tenon hole width
knob (#5). This adjustment allows three mortise
widths which equal the diameter of the installed bit added to 13mm, 19mm, and
23mm. So with a 10mm bit installed that works out to 23mm, 29mm and 33mm
(see, I can add in metric). This adjustment should always be performed
with the tool running to ensure proper engagement of the swivel mechanism.
The
final adjustment control we'll need to make our mortises is the tenon hole width
knob (#5). This adjustment allows three mortise
widths which equal the diameter of the installed bit added to 13mm, 19mm, and
23mm. So with a 10mm bit installed that works out to 23mm, 29mm and 33mm
(see, I can add in metric). This adjustment should always be performed
with the tool running to ensure proper engagement of the swivel mechanism.
The purpose of the larger mortise widths is
for a couple of reasons. First, when using the smallest size the precise
location of the mortise is very important because there is no play either
vertically or horizontally so your pieces are going to line up where the tenon
makes them line up. That being said there are times when you don't need
such a precise location of your mortises...usually across the width of the
tenon. An example of this is when using tenons to end join a panel.
We are interested in vertical alignment because we want the panels to be flush
at their faces but we probably don't care about horizontal alignment and having
tight horizontal alignment will serve nothing but to make the joint more
difficult to make. The second reason is wood movement. In certain
applications having elongated mortises in a cross grain situation will allow for
movement if you glue only one side. I am using this method for the shelf
on the coffee table that I'm building for this review. Read the Domino in
Use section of this review for more information.
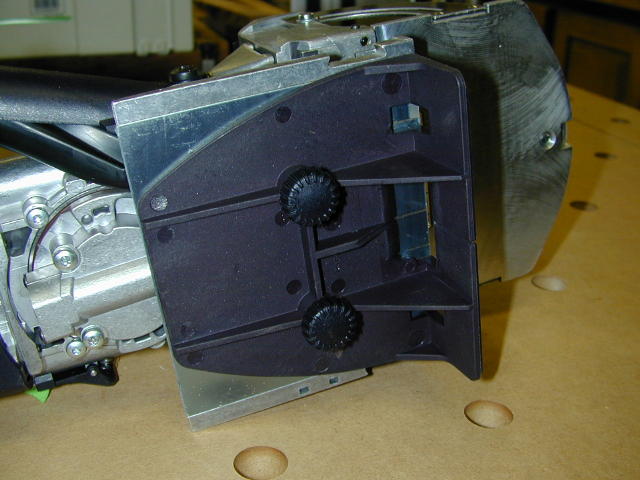
The Support bracket can be used to add surface area to the face of the Domino to aid in stability. The Support is a simple right angle bracket that attaches to the base of the Domino with two thumb screws.
Domino Bits:
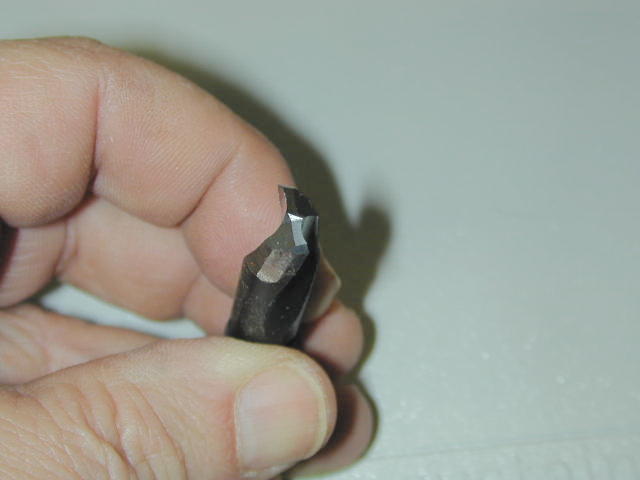
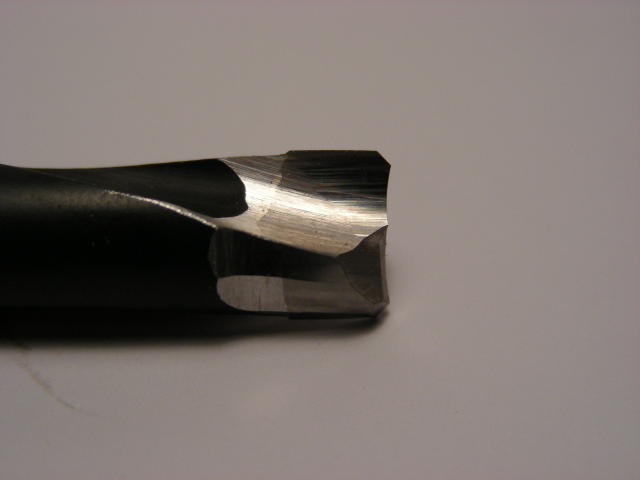
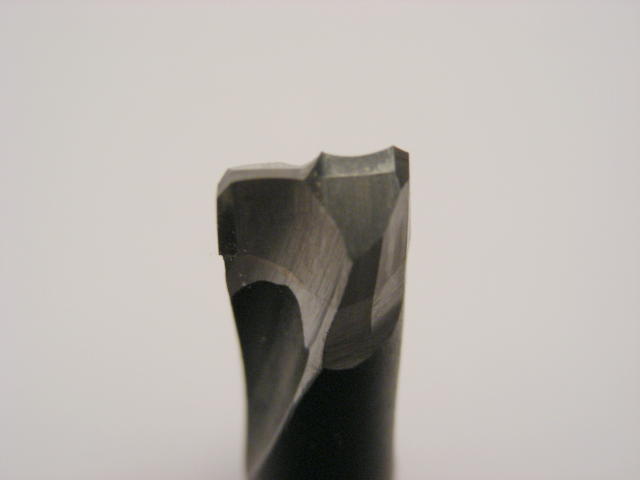
The Domino is shipped with a 5mm bit. There are Domino tenons in thicknesses of 5mm, 6mm, 8mm and 10mm and each different thickness requires a similarly sized bit. At right I'm holding the 10mm bit which is the largest Festool offers. The bits are sized so that they can be sharpened between 1 and 3 times before they are too short to create an acceptable width mortise. Festool says that the sharpening process can remove up to 1mm of material and still result in a useable bit. I measured all my bits and they averaged 48.75mm so that would make the minimum serviceable length after sharpening at 47.75mm If you decide not to sharpen fear not, Festool reports that the bits will last about 4,000 mortises when milling into the end grain of hardwood and 15,000 when milling into the side grain of soft wood. Those numbers are at the two extremes of the scale so we're likely to get something in between. In any event if the bits come close to that lifespan most of us will probably just buy a new one rather than sharpen them.
For those of you wondering how the Domino bit could last that long, the answer is two fold. One reason is that the bit is carbide tipped but that isn't really the main reason for the longevity. The Domino bit unlike a drill bit is always moving. A drill bit turns and turns over and over at the same spot generating heat and wear. The constantly moving Domino bit avoids most of the conditions and stresses that cause a normal drill bit to wear out.
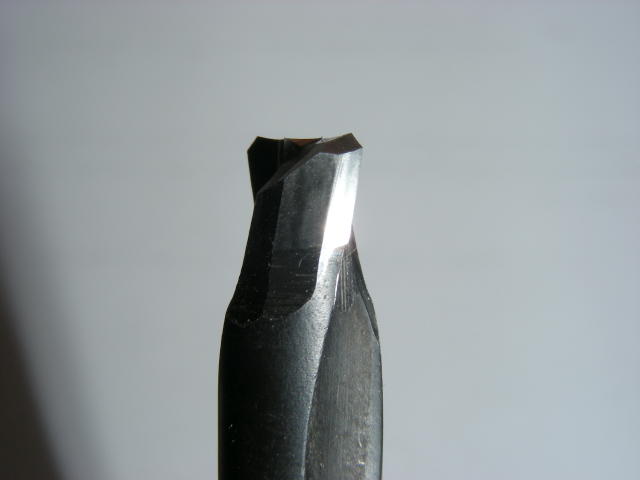
Below are more shots of the 10mm bit. In the first photo on the left you can clearly see the carbide tip.
[Page 1] [Page 2] [Page 3] [Next]